I have built this guide as a two-week itinerary for Iceland, starting with your first full day on day 1, or when you will arrive in the early morning like we did, and ending on day 14, which would be your last full day in Iceland. This itinerary also reflects the activities that we did.
This guide helps to narrow down the hundreds of things to do in Iceland to fit a realistic two-week itinerary, while adding relevant comments for each activity. I also make sure to include the most popular activities, along with some that are off the beaten path. I also added extensive comments to each of our activities to guide you through the attractions. If you were to only read this and to follow this exact itinerary, you would easily make it to every location and have a good idea of what expectations to have.
I have included in this guide not only the activities that we did, but also useful google maps links that we used, our camping spots, our ratings about each activity, whether we think it is overrated or not, whether there is a parking fee, the duration of each activity, what to pack, if drones are allowed, and many more useful information.
We travelled to Iceland at the end of June 2023. During this time, the F-roads that we wanted to drive on were open. However, if you want to spend a lot of your time in the Highlands, I recommend coming to Iceland in July or August, where more F-roads would be open.
I really hope that this guide helps you plan your next trip to Iceland. Whatever you decide to do and however you decide to experience it, I already know that it will be incredible. Iceland was truly one of the best trips of my life, and I really wish the same for you!
Table of Contents
- General Information
- Day 1: Costco and Glymur Waterfall
- Day 2: Búðakirkja, Kirkjufell + Kirkjufellsfoss and Hvitserkur
- Day 3: Goðafoss, Hverfjall, Hverir and Krafla Viti
- Day 4: Stuðlagil Canyon, Hengifoss and Laugarvellir
- Day 5: Storuð and Seydisfjordur
- Day 6: Vestahorn, Jokulsarlon Glacier and Diamond Beach
- Day 7: Fjallsárlón Glacier, Múlagljúfur Canyon and Svínafellsjökull Glacier
- Day 8: Fjaðrárgljúfur, Hjörleifshöfði and Reynisfjara
- Day 9: Skool beans and Þakgil
- Day 10: Dyrhólaey, Skógafoss, Seljalandsfoss and Reykjadalur Hot Spring Thermal River
- Day 11: Golden Circle
- Day 12: Horseshoe Bend and Kerlingarfjöll
- Day 13: Sigöldugljúfur, Bláhylur and Landmannalaugar
- Day 14: Blue Lagoon, Puffin Tour and Reykjavik
- Useful Links
- Our Packing List
- How We Cooked
- Costs
General Information
Should I visit Iceland during the summer or during the winter?
It depends on the type of experience and activities you are looking for.
In the summer, you will be able to witness the Midnight sun, which is when the sun never sets, leaving the country in brightness for 24 hours. In addition, during the summer, the F-roads are open, which gives you access to explore the Highlands. Ice cave tours are offered by a few companies, although less than the wintertime. Most camping sites are open.
During winter, the days get shorter and shorter. However, the dark nights leave the opportunity for seeing northern lights. The F-roads are closed due to the snow. Ice cave tours are a very popular activity. Many campsites are closed in the winter, so make sure to check in advance.
What is the ring road?
The ring road, also named Highway 1, is a road that makes a circle around Iceland. The road is very well maintained and is the most popular road in Iceland. It is also very accessible to many tourist attractions.
In which direction should we drive the ring road?
The popular route of road trip in Iceland is the ring road in counterclockwise. We decided to drive it clockwise because we wanted to keep the Highlands for the last. There is no right or wrong way to drive the ring road.
What are F-roads?
F-roads are unpaved roads found in the Highlands. You must drive on F-roads with a 4×4.
For more information, you can visit websites such as this.
We drove on a few of the main F-roads, which were F45 and F208 North (FYI, F208 South is a completely different road!).
For transportation, should we pick a base in Iceland and do daily trips from there? Or should we go along the ring road in one direction?
Personally, we decided to go along the ring road in one direction, counterclockwise. We felt that it helped us save on traveling time since we did not have to come back on the same route. However, there are pros and cons in doing either of them. By going in one direction, you get to save time on transportation, but you constantly move locations, which could be unenjoyable for some people. By picking a base location, you can come back to familiarity. If staying at an Airbnb, you do not need to unpack your bags every day. It all depends on the way you would like to travel.
For accommodations, should we go stay at hotels, Airbnbs or camping sites?
The accommodation that you choose really depends on your personal travel style and/or the way you want to experience your trip. We personally opted for camping because it was the cheapest option and allowed for a lot of flexibility. Camping sites ranged from 10.00 to 25.00 CAD per person per night. We also chose our camp site for the night right after our last activity of the day, and the campsites always had availabilities. Therefore, if we were early or late on our original itinerary, we were flexible to changes.
Staying at an Airbnb or hotel is more comfortable. However, it will be a lot pricier. In addition, it allows for less flexibility, since it is recommended to book the accommodations many months in advance, and the longer you wait, the less choices you will have (except for camp sites).
Should we do activities with a tour company? Or should we rent our own car and go by ourselves?
This also really depends on your personal travel style. We personally rented our own car and explored by ourselves. We rented a 4×4 Suzuki Grand Vitara with a rooftop tent. We prefer discovering places on our own and deciding our own schedule. Also, going by ourselves is a lot cheaper. The only tour that we did do was a Puffin Tour in Reykjavik, but we did that tour because we were unfortunately unable to see puffins on our own during our ring road trip. Tour companies can be helpful however because you do less planning. In addition, the transportation is included, so you do not need to worry about driving in certain difficult conditions.
Do we need to pay for parking at the different attractions?
In this itinerary, I will state whether the parking is free or not. For each activity where it was mentioned that a fee was required, it was around 5.00 to 12.00 CAD.
Are drones allowed in Iceland?
Drones are legal in Iceland. However, you need to follow their rules. In some locations, they also have a sign if drones are prohibited. We also included in the guide if drones were allowed for each activity. Please make sure to also check when you arrive because regulations are always changing.
Click here to get the drone that I used.
Should I travel to Iceland as a solo female?
Iceland is one of the safest countries. Therefore, as a solo female, you can travel without major safety concerns. As for the experience, whether you are a solo female or not, I personally recommend traveling with another person if you don’t like spending a lot of alone time. Traveling around Iceland is very different compared to other European countries because the country is very remote. Therefore, you do not get the hostel experience of meeting many other people as you would for example in a social hostel in Spain.
Do you think that rain jackets and/or rain pants necessary?
Before arriving, we heard that Iceland’s weather can be raining during the summer. So, we had only packed a rain jacket. However, we did not think that rain pants were necessary.
Being someone who goes outside rain or shine because “I did not travel thousands of miles to be indoors”, I really should have bought rain pants beforehand. In fact, we went to buy rain pants at a store in Iceland around halfway through our trip. There was too much rain for us to continuously be outside while having our legs soaking wet. However, if you would rather relax a bit more during rainy days and find indoor activities, rain pants might not be necessary for you.
Invest in good clothes if you plan on doing a lot of outdoor activities.
With whom do you recommend booking your rental car with?
We booked with Northbound.is. We had a great experience with them! They are a company that finds the best car rental deals in Iceland. Our pick up experience was also super smooth. They picked us up at the airport with a shuttle earlier than we had planned since we arrived earlier. They are also super easy to contact if ever you have questions (we contacted them a few times for questions and they always responded very fast).
Tent camping or camper van?
We chose the tent camping option (on the roof of the car) because it was a lot cheaper. However, if we could go back (and have more money), I would choose a camper van.
Do they speak English in Iceland?
Yes! There is no need to use google translate.
For the campsites, did you book in advance?
For each of our campsites, we always chose it after our last activity of the day and just showed up. We never encountered a situation where the site was full.
Which gas stations did you go to?
We got our gas at N1 and Olís because we had discounts at those companies. Our rental car company gave us special gas discounts.
Other than Costco, where did you do groceries?
We did most of our groceries at Nettó, Krónan and Bónus. They are budget grocery stores.
Since you were camping, how did you cook your meals?
In Iceland, we bought gas tanks at the gas stations. In two weeks, we used two gas tanks. However, we also cooked a few times using the kitchen stoves at some campgrounds. From home, we brought cooking pots and a small stove.
Do the activities that you did require a lot of physical activity?
For each activity, I graded on a scale from 1 to 4 the level of physical activity.
1. You can see the sight from the parking lot without major physical movement.
2. You can see the sight from the parking lot after a short walk that is less than 500 meters.
3. You can see the sight from the parking lot after a longer walk that is more than 500 meters.
4. You can see the sight after a hike.
Are the river crossings in your itinerary?
There are no river crossings in our itinerary. Although you have the option to do river crossings, the river crossings are very close to the destination, so it is not necessary for you to cross it. You can just park before the river crossings, which is what almost everybody does.
How often did you need to go to the grocery store?
We went to the grocery store every day, particularly because we needed to buy ice for our cooler.
Day 1: Costco and Glymur Waterfall
8:00 am: Arrival
Our flight landed at 8:00 am.
9:00 am: SIM card
At the airport, after baggage claim, we were able to get a SIM card, which allowed us to use data.
Although we also had a portable WIFI box that was included in our car rental, we were happy to have the extra data that allowed us to access the internet if the WIFI box did not have any more battery.
They only have selected packages, which means that you cannot choose exactly the amount of data you would like, if you want unlimited calls and texts, etc. When we went, the package that we bought was 20.00 CAD for 20GB of data, unlimited calls, and unlimited texts. The store was called 10/11. It isn’t obvious that they sell SIM cards because from the outside, it looks like they only sell food, but you just need to ask the cash register if you can buy a SIM. Of course, there are also different other ways to have data in Iceland.
If you would like to get an eSIM before landing, you can also get it with Airalo. I only learnt about Airalo after my trip to Iceland.
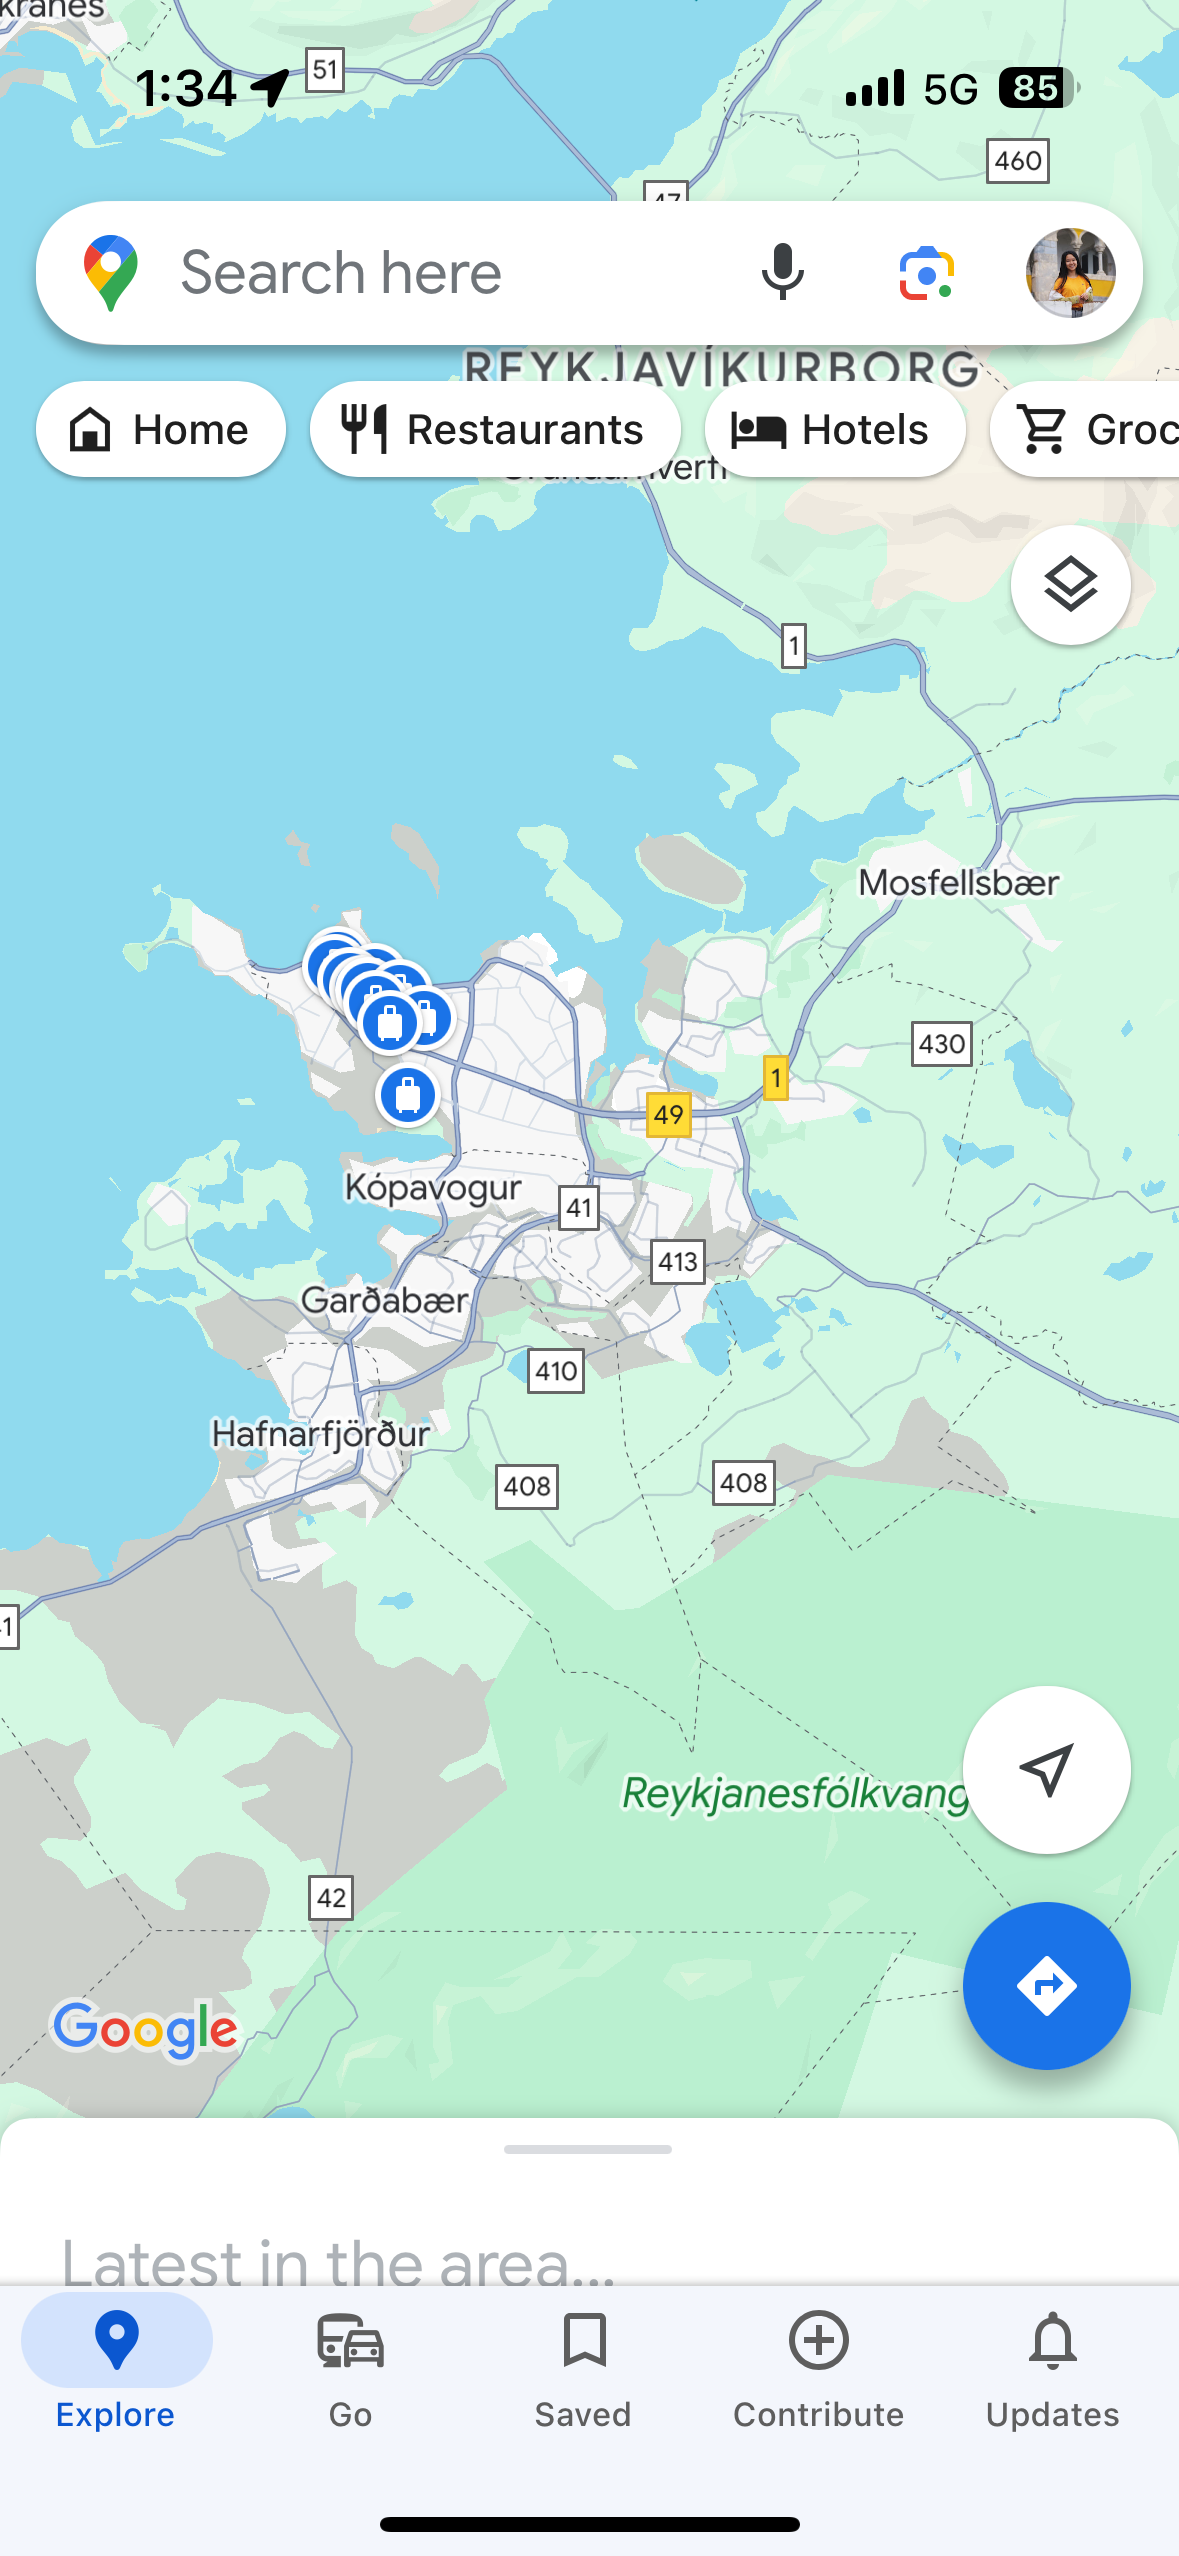
Tip: On Google Maps, you can download an offline map of the country. You will have access to car navigation if ever your data does not work. Simply go to the Google Maps app. Then, in the search bar, type for example “Reykjavik.” Then, scroll to the right, where you will see a button “Download offline map.” Fit the image to the size of your liking. If you want to download the offline map of the whole country, you will realize that it will not let you do it in one shot. You can just redo the same procedure three times, each time moving in direction to cover the whole map.


10:00 am: Car Rental Pickup
Our rental car company picked us up at the airport at 10:00 am. They brought us to the location of their rental office since it wasn’t right next to the airport. At the rental office, we got access to the keys of our home for the next 2 weeks. We booked through Northbound.is.

12:00 pm: Costco
We went to Costco to stock up on food for the trip. Since Costco only sells in big packages, we only bought dry foods such as pasta, bread, nuts, crackers, etc. Costco is a lot cheaper than other groceries stores, so this was helpful to save money. The only downside is that the food comes in bulk.
Make sure to bring your Costco membership card because they will scan the bar code! The card is also needed if you want to use the Costco gas station.
Tip: I don’t know if this is considered a tip, but get hot dogs at Costco! They are very good and cheap compared to the other hot dog places in Iceland. It costed us 3.00 CAD (which is a lot for a hot dog in Canada in my opinion, but the other hot dog places that we saw were between 7.00 CAD to 10.00 CAD per hot dog…).
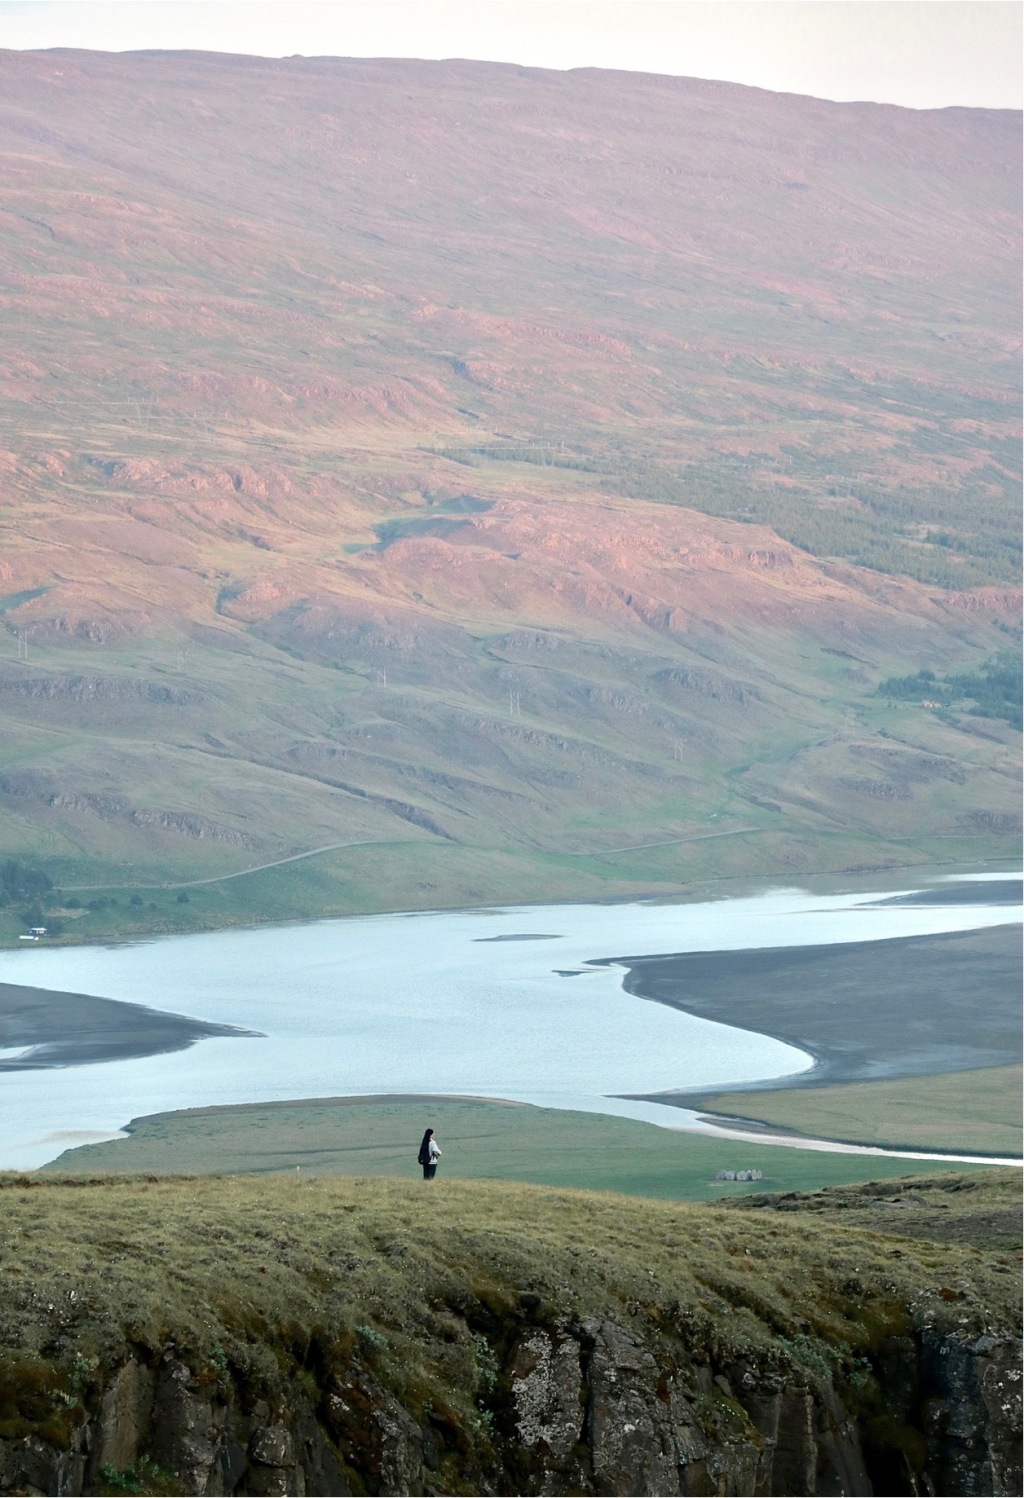
3:00 pm: Glymur Waterfall Hike
- Parking fee: Free
- Time spent: 5 hours
- Rating: 9/10
- Drones allowed: Yes
- Physical activity: 4/4
We arrived at the parking lot of the Glymur Waterfall hike. It is free to park here. There are no toilets. The parking lot is labeled “Botnsá and Glymur Parking” on Google Maps. When we arrived, the parking had many available spots left. However, you might want to be careful if you go early afternoon and/or during high season (July and August).
Distance: 8 km round trip (Red and Yellow trails)
- Elevation gain: 463m
- Difficulty: Hard
- Length of Time: 3 to 5 hours
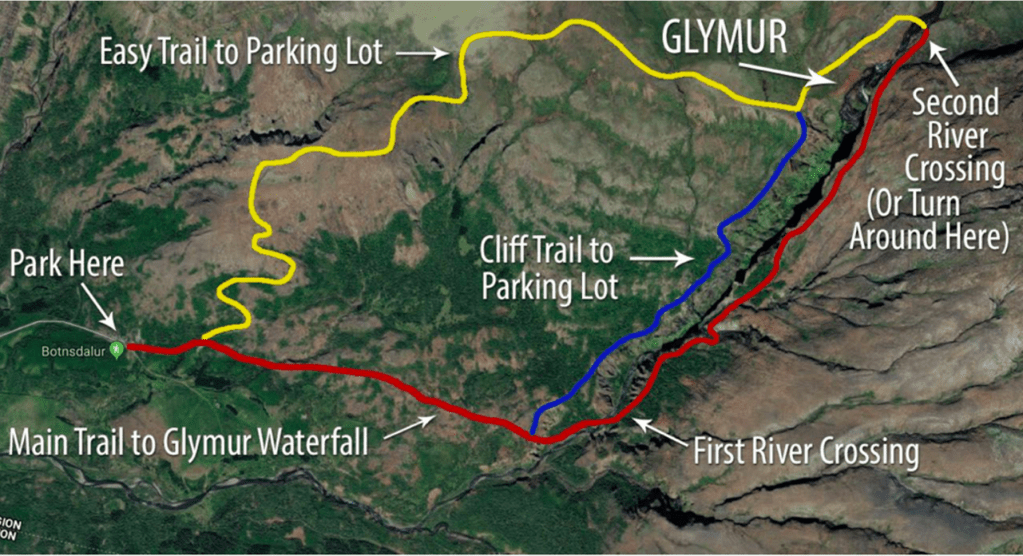
There are two different ways to do this hike: as a loop or as an out-and-back hike.
If you do it as an out-and-back hike, you will hike up the red path and return the same way. On this hike, you will do one river crossing with the help of a log.
If you do this as a loop like we did, you will hike up the red path, and return by walking down the yellow path. The second river crossing, between the red and yellow path, adds a nice little twist to the hike and you get a different view of the waterfall from the yellow path.
The red path has one river crossing. It is also a lot more difficult than the yellow path, but it is gorgeous. As for the river crossing, I would recommend getting water shoes. The river crossing is easily done. For the first half of the crossing, you step on rocks and on the second half, there is a big tree that you can walk on. You also have a rope to hold onto. If you do not have water shoes, you can even do this crossing without shoes since people have told me that is it not slippery. However, I crossed with my sneakers (not waterproof).

Between the red and yellow path, there is a second river crossing. It is a longer one, a lot colder, and you are walking on rocks the whole time (no rope or tree). I would recommend wearing shoes in this case (whether it is water shoes or not) since the rocks can be a bit painful if bare feet, which then slows you down when you walk. This river is also the river that forms the Glymur Waterfall.
Before crossing, make sure to evaluate the best location to cross. That would be where the current is smallest and where the water is shallow. Also, most people did not complain about this, but I thought that the water was freezing. My feet were in so much pain from walking in the water.

The yellow path is an easy walk down. There are no river crossings or particular challenges.
The hike is absolutely gorgeous. We were so lucky to have the perfect weather. The sky was blue, and the sun was shining. Also, there were not that many people hiking the trail, which is always a plus. We saw around 8 people total. This place is so underrated, and we recommend it so much if you are physically capable!
9:00 pm: Campsite
We arrived at our campsite called Borganes Camping.
- Personal rating: 3/5
- Explanation: They had two sinks for dishes and four toilets. There were no showers. There was nothing extraordinary about the campsite, but it met our basics needs. Also, it was next to a main road, so it was a bit noisy. We were able to sleep quite well even next to the road (so maybe not recommended for people who are more sensitive to noise at night).
Day 2: Búðakirkja, Kirkjufell + Kirkjufellsfoss and Hvitserkur
1:00 pm: Búðakirkja
- Parking fee: Free
- Time spent: 45 minutes
- Rating: 6/10
- Drones allowed: Yes
- Physical activity: 1/4
Enter the name of the church “Búðakirkja” on Google Maps and it will lead you to the right parking. When we were there, the inside of the church was busy, but maybe when you go, it will be accessible for tourists.
There is also a walking trail right next to the church. We decided to walk around for thirty minutes and got to see a bunch of sheep hanging around.
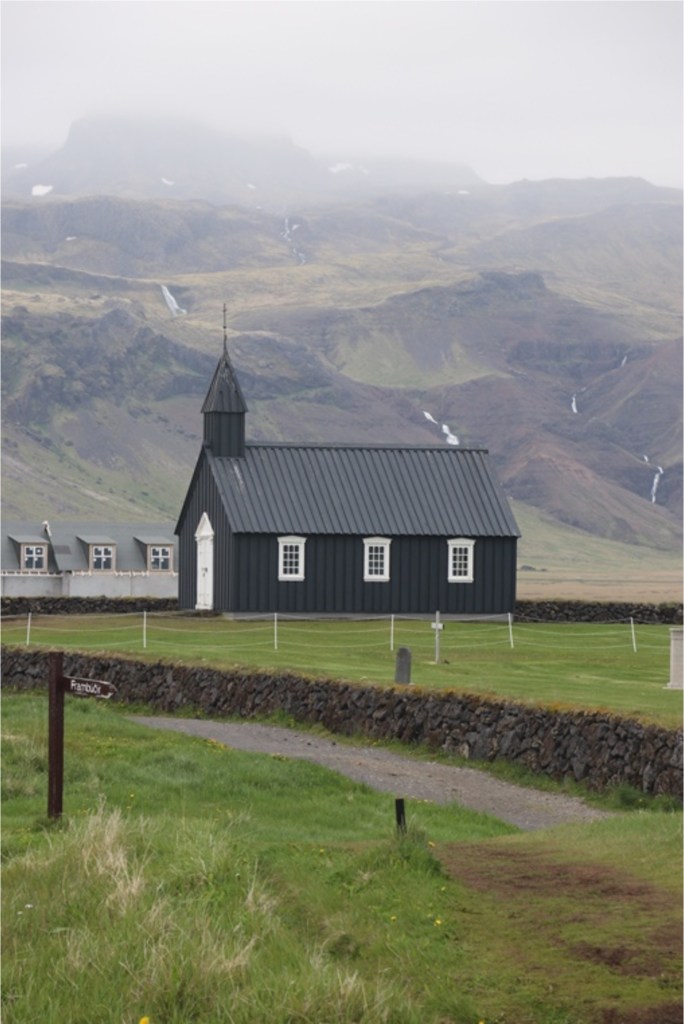
Note: If you have time and/or are interested, there is also another highly visited church near Budakirkja, called Ingjaldsholskirkja. We decided not to visit it since we felt that the extra drive was not worth it. We decided to choose between Budakirkja and Ingjaldsholskirkja and went with Budakirkja due to the black exterior that we thought was unique.
3:00 pm: Kirkjufell and Kirkjufellsfoss
- Parking fee: Yes
- Time spent: 20 minutes
- Rating: 7/10
- Drones allowed: No
- Physical activity: 2/4
Kirkjufell is the name of the mountain. Kirkjufellsfoss is the name of the waterfall. If you want to photograph at the very famous location like the picture below, make sure to go to “Kirkjufellsfoss Parking Lot” on Google Maps.
From the parking, it is a very short walk to the viewpoint (around 150 meters).
The viewpoint is very picturesque and perfect for photography. However, we felt that this attraction was a bit overrated. Throughout your drive across Iceland, you will see so much random pretty scenery. Therefore, we felt that the mountain and the waterfall were very similar to the other scenery, so we did not get the hype around this one specific scenery as they were all gorgeous. Nevertheless, we still recommend for you to visit because it is gorgeous and of course, iconic.

8:00 pm: Hvitserkur
- Parking fee: Free
- Time spent: 30 minutes
- Rating: 7/10
- Drones allowed: Yes
- Physical activity: 2/4
To get there, enter “Hvitserkur parking lot” into your Google Maps. Once you arrive, it is a quick walk to the viewpoint (around 250 meters). The viewpoint is on a wooden platform.
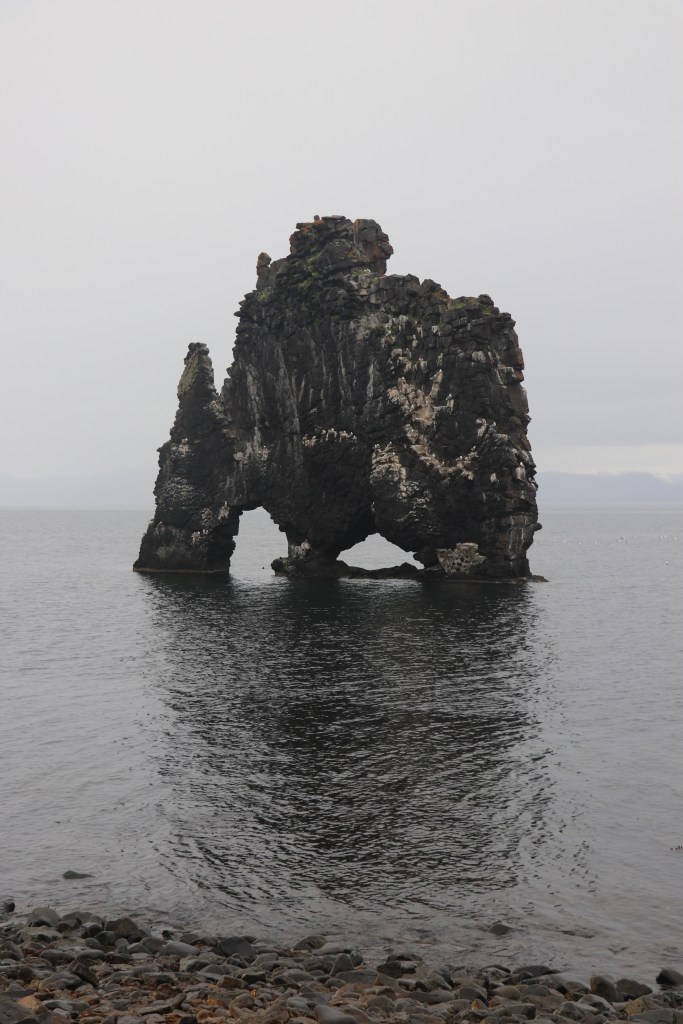
Hvitserkur is a rock in the ocean that has the shape of a rhino. It looks unique because it is secluded and because it has a very interesting shape.
From the wooden viewpoint, you can also go down the hill to see the rock up close. However, be careful because it is steep and there are many rocks. When you get down, you get a closer view of the rock, and you can walk along the water.
10:00 pm: Campsite
The campsite was called Hotel Húni. What’s interesting about this place is that it is an old school turned into a hotel/camping site. When we arrived, we saw a parking lot and a big building with not much grass and not many people, which left us very confused. However, after going inside the building and meeting the workers of the campsite, we realized that it indeed was a real campsite. In fact, people staying at the hotel would stay inside of the building, and those camping could stay in the parking lot or in a designated terrain of grass.
- Personal rating: 3.6/5
- Explanation: They had showers, a nice washroom, and free WIFI included. The showers were included in the camping site fee.
Day 3: Goðafoss, Hverfjall, Hverir and Krafla Viti
1:00 pm: Goðafoss
- Parking fee: Free
- Time spent: 45 minutes
- Rating: 5/10
- Drones allowed: No
- Physical activity: 2/4
There are two accessible parkings to Goðafoss. We parked at “Godafoss West Bank Parking,” but there is also the “Godafoss East Bank Parking.” Both parkings seems very good.
From either parking, you will need to walk a little bit to get to the viewpoint of the waterfall. There are multiple viewpoints, such as on top of the waterfall, on the bottom, etc., so you can see it from multiple angles.
You will also find a small building where they sell souvenirs, sell food, and have restrooms.

4:00 pm: Hverfjall
- Parking fee: Free
- Time spent: 30 minutes
- Rating: 8/10
- Drones allowed: Yes
- Physical activity: 4/4
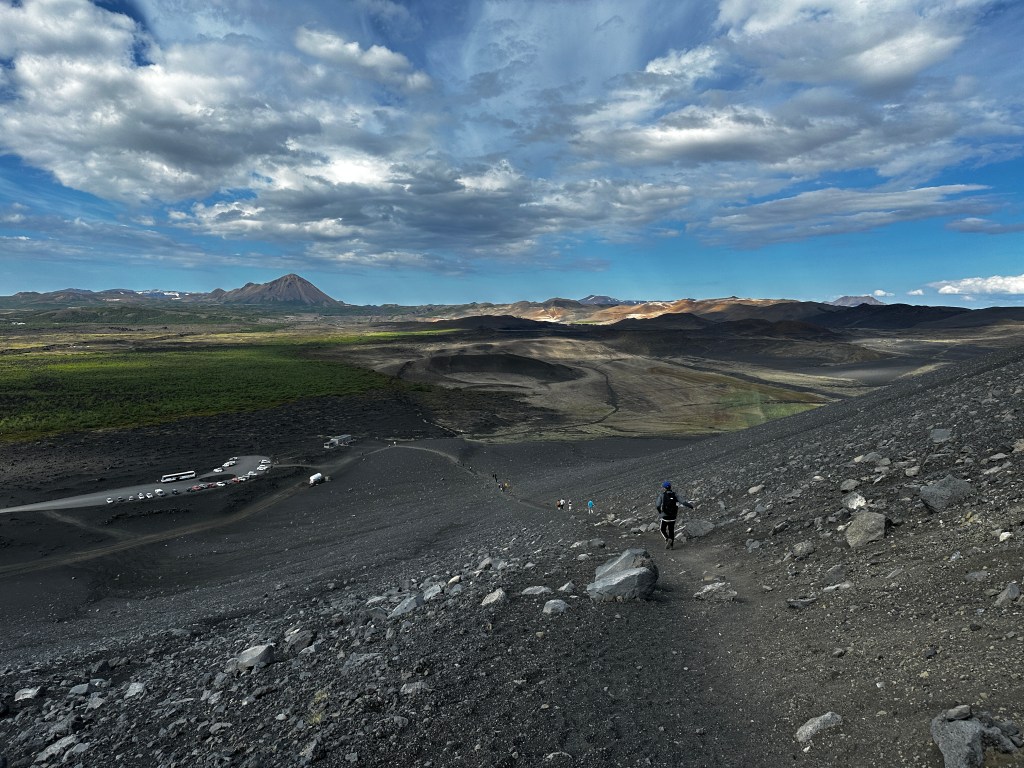
Hverfjall is a crater of 1km in diameter. We hiked up the crater. To get there, simply put “Hverfjall” on Google Maps, and it will lead you to the head of the trail, which is where the parking lot also is.
The hike up is quick and simply a straight line from the parking lot. Once you get up, you can see the crater of the volcano. You can also walk around the rim of the volcano. However, we did not walk around it because we felt that the view would be very similar at all points.
6:00 pm: Hverir
- Parking fee: Yes
- Time spent: 30 minutes
- Rating: 6/10
- Drones allowed: Yes
- Physical activity: 2/4
Hverir is a geothermal area. Because there is a lot of sulfur, it doesn’t smell great. To reach the site, simply type “Hverir” onto your Google Maps, and it will bring you to the parking.
You can walk around the geothermal area. The floor has an orange colour which is really fascinating, and there are steamy holes.
Aside from the smell, we really enjoyed visiting Hverir because the scenery was very interesting. However, we did find that the parking was a bit pricey for the little amount of time we spent there.

7:00 pm: Krafla Viti Crater
- Parking fee: Free
- Time spent: 30 minutes
- Rating: 9/10
- Drones allowed: Yes
- Physical activity: 2/4
The Krafla Viti Crater is a crater with gorgeous blue water inside. To get there, type “Viti Crater (Krafla) Parking” into your Google Maps search bar. From the parking, it is an approximate 25-meter walk until you see the crater.
The crater is very pretty and is not crowded like other touristic craters. I highly recommend if you want to visit a crater that is not Kerid.

9:00 pm: Campsite
The campsite that we stayed at was called Grimsstadir. The reason we stayed at this campsite was because it was the one that was close and on our way.
- Personal rating: 1/5
- Explanation: Honestly, I do not recommend this campsite. We did not have service, so we were unable to use our data. Also, there were so many little bugs there that we didn’t even end up cooking because being outside was not enjoyable. Also, there were no showers. The sink water only had cold water, so we could not wash our faces with warm water.
Day 4: Stuðlagil Canyon, Hengifoss and Laugarvellir
1:00 pm: Stuðlagi Canyon
- Parking fee: Free
- Time spent: 3 hours
- Rating: 9/10
- Drones allowed: Yes
- Physical activity: 3/4
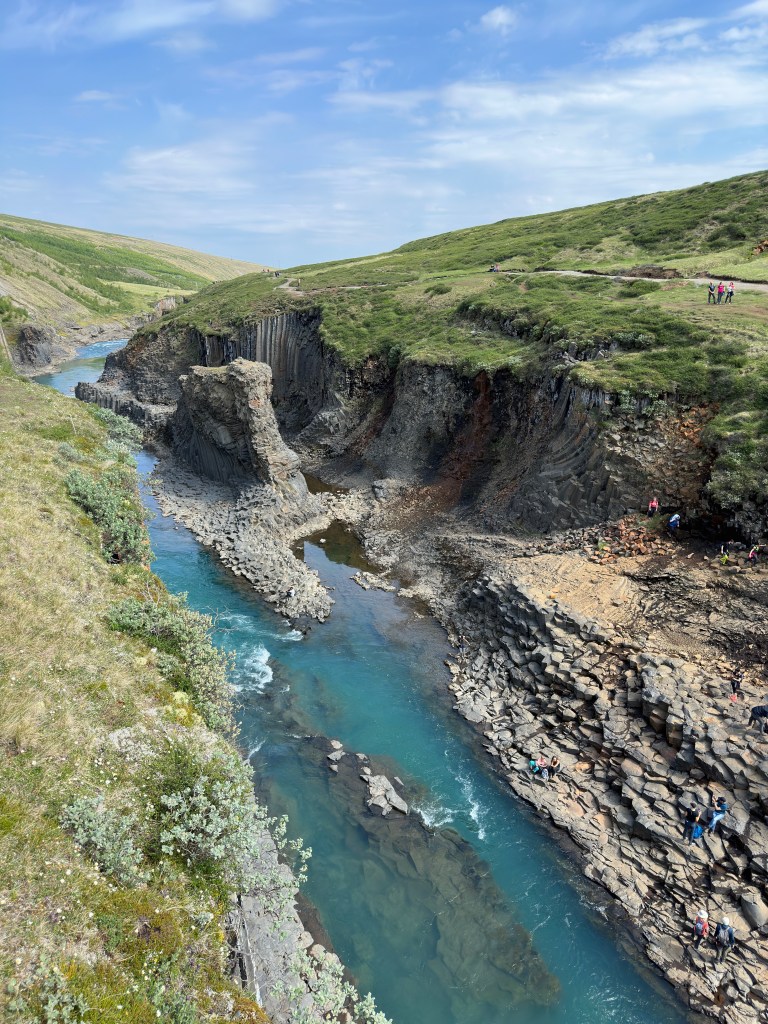
Stuðlagil is a basalt canyon with gorgeous blue water running through it. To get there, there are two different parking that you can go to. The first parking allows you to view the canyon from above and requires a short walk, whereas the second parking allows you to get to the water level of the canyon and requires a longer walk. We went to both parkings, although I recommend the second parking the most.
To get to the first parking, type “Studlagil Canyon Viewpoint” on Google Maps. Once you get there, you need to go down a set of stairs for you to reach the viewpoint. The viewpoint is a small platform. At the first parking, there are restrooms and food that you can buy.
To get to the second parking, type “Parkplatz Klaustrusel – Studlagil” on Google Maps. Once you get there, you need to walk around one km before reaching the canyon. There are no washrooms there.
Once you get to the canyon, you can either admire it from the top or you can walk down to the base of the canyon. Once you get to the base, you can walk along the water. Some people will also go in for a dip, so maybe consider bringing a bathing suit, although many people went in with their clothes. Just beware, the water is super cold and make sure that there are no strong currents.

I absolutely loved this place, especially when we reached to the bottom of the canyon. On a sunny day, you can also find people tanning there while lying down on their towels. We sat down for a while at the bottom and simply dipped our feet in the water and soaked in the sun. We went there in the afternoon and there were a good amount of people, so if you want to beat the crowds, I recommend going early in the morning.
6:00 pm: Campsite
We arrived at our campsite called Hengifoss Campsite. Usually, we arrive at the campsite after our last activity. However, this time, we wanted to go to the campsite to cook an early dinner and to relax a bit before continuing our activities.
- Personal rating: 4/5
- Explanation: They had showers, washroom, free WIFI, an outdoor sink for dishes, and an indoor common area. The campsite was also very well located, near Hengifoss.
8:00 pm: Hengifoss
- Parking fee: Free
- Time spent: 2 hours
- Rating: 9/10
- Drones allowed: Yes
- Physical activity: 4/4
To get there, search “Hengifoss carpark” in Google Maps. The hike is gorgeous and had no particular challenges. We hiked up directly from the parking lot using stairs that were there. Once we reached the waterfall, we did a loop on our way back. Whether you go back on the same trail or do the loop, the difficulty is the same.
We went at 8:00 pm and there were only 4 other people on the hike. I don’t know if it gets crowded during the day, but when we drove past the parking the next morning after camping at Hengifoss campsite near the waterfall, we saw that the parking was full. However, I would recommend doing the hike in the morning or afternoon like that you get great lighting towards the waterfall, even if it gets more crowded.


1:00 am: Laugarvellir
- Parking fee: Free
- Time spent: 1 hour
- Rating: 10/10
- Drones allowed: Yes
- Physical activity: 2/4
Technically this would be day 5 because we went at 1:00 am, which would be the next day. However, since we hadn’t slept yet, I am considering it day 4.
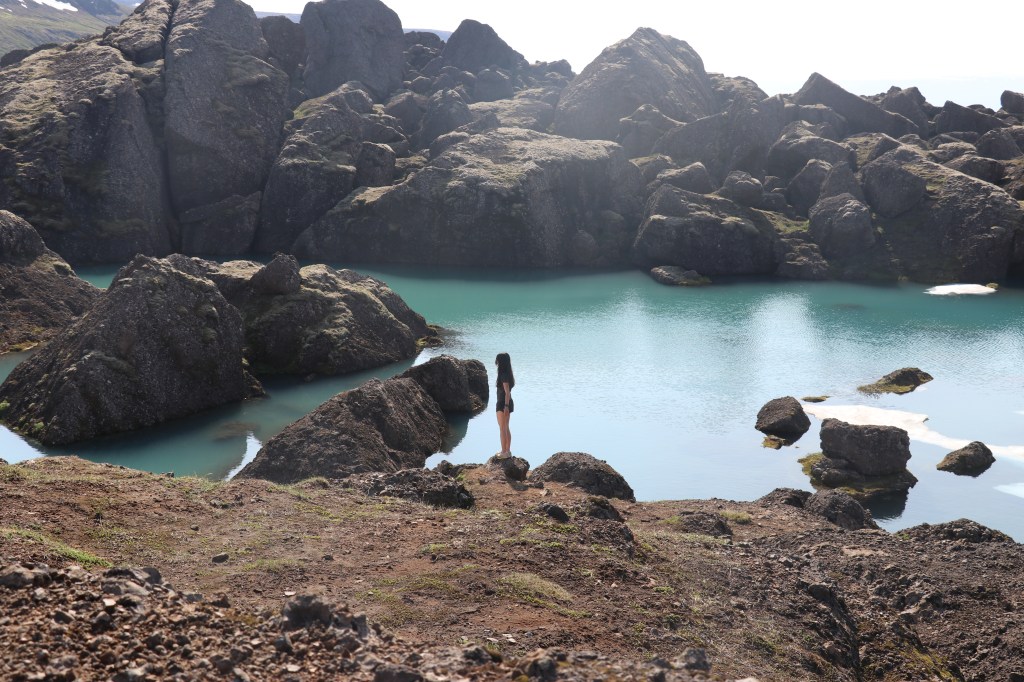
Laugarvellir is a natural hot spring situated in the Highlands, formed by a waterfall.
I felt that this place was a tricky to get to. When I read online information about this hot spring, the way to get there seemed straight forward, but I found it a bit confusing for some reason. So, let me take you through how to get there.
We recommend getting a 4×4 if you want to get to the closest parking lot. If not, what seems to be done by people without a 4×4 is that they park their car right before the F-road and walk to the hot spring. However, the walk seems to be long.
Starting from Hengifoss (red cross), drive down on road 931 (purple line) until you reach the intersection to road 910. Turn right on road 910 (blue line).
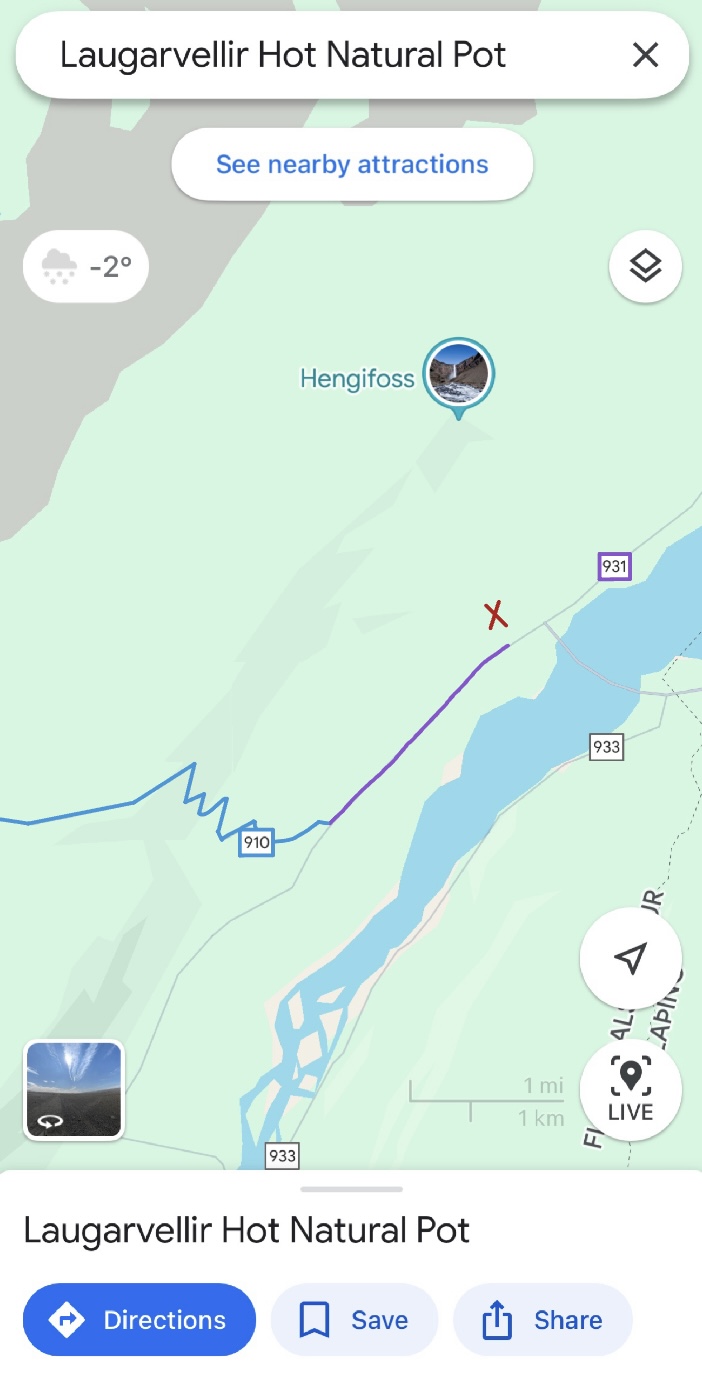


While driving on road 910 (blue line), you will pass by a big electric damp. A bit after that, you will get to F908 (green line). However, the F-road is not written on Google Maps. It was confusing when the road completely changed, but we realized it was because it was the start of an F-road that was not marked.
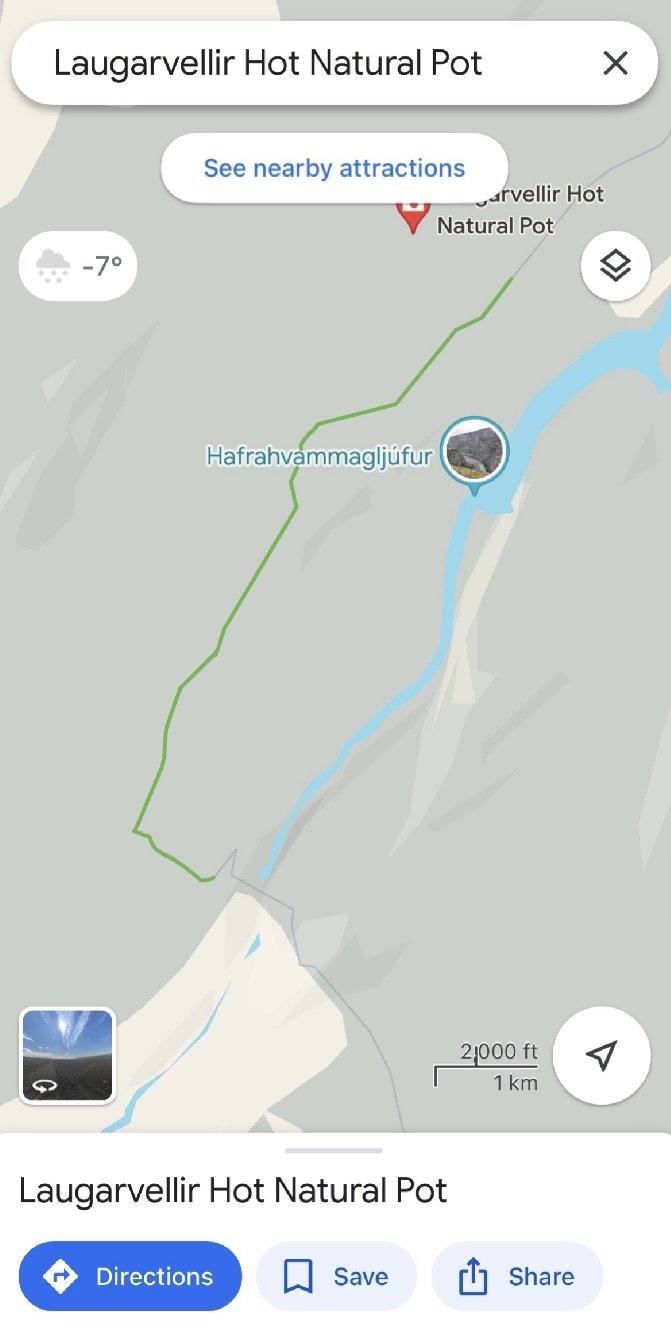
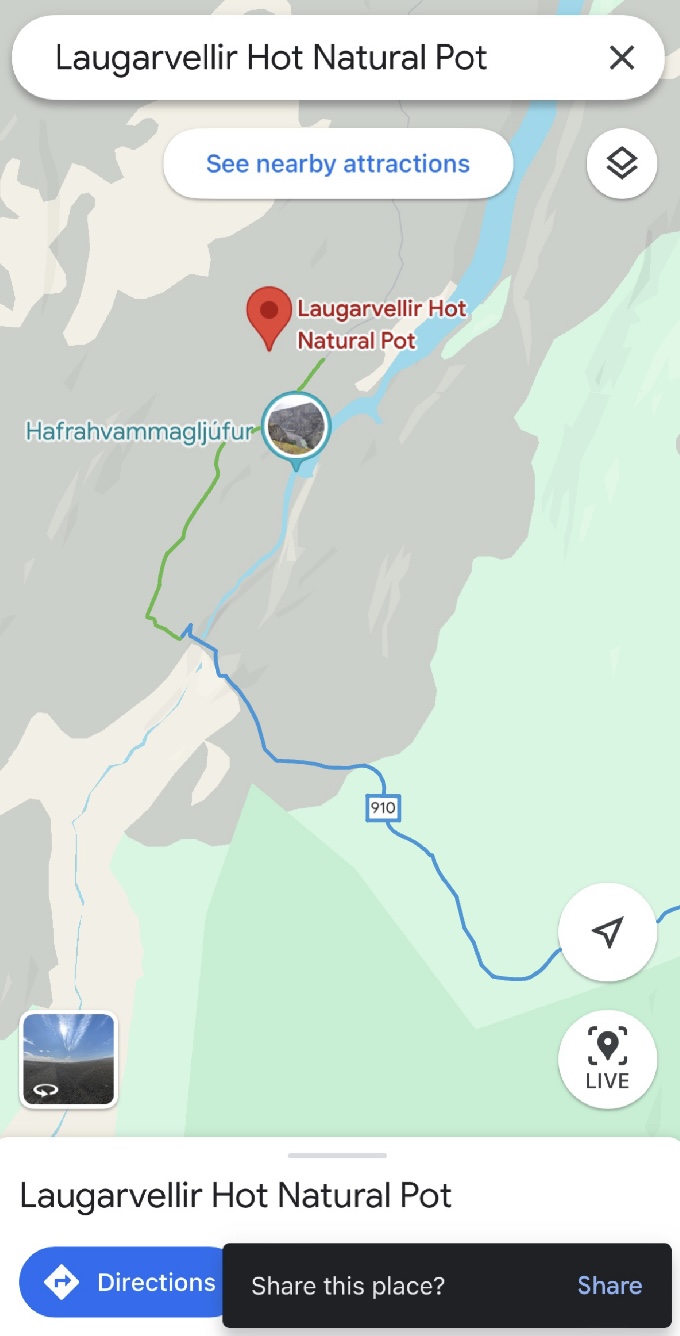
After driving for a bit on F908, on your left, you will see a big information banner that talks about Laugarvellir. Drive past the banner. The road will seem narrow, but this is the path to take to get to the closest parking lot. In addition, on Google Maps, it will not tell you to go this way, but this is in fact the right direction to go.
If you reach a point where you are driving a very steep downhill, know that you are in the right direction. After getting down the hill, there will be a river crossing. However, there is a parking lot right before. Thus, you can park your car before the river, and cross by a bridgethat is built there.
While walking, you will reach a small hut. From the hut, walk straight and to your right. You will walk down a small hill. You will then reach the small waterfall of the hot spring.
Laugarvellir is beautiful and an amazing place to be if you want to be alone. We were the only ones there (although we were there at 1:00 am). The water temperature is also perfect, and the ground that you sit in is very comfortable. Although it was a tough drive, it was totally worth it. The difficult drive even adds to the satisfaction of finding this secluded spot.

Day 5: Storuð and Seydisfjordur
1:00 pm: Storuð
- Parking fee: Free
- Time spent: 6 hours
- Rating: 10/10
- Drones allowed: Yes
- Physical activity: 4/4
Storuð is a gorgeous hike in the east of Iceland. There are multiple ways to hike to Storuð. For each trail, the parking is different. We hiked the Njardvik trail out-and-back. The parking for that is called “Njardvik (Storud Trail Head)” on Google Maps. The parking is small, but not many people hike this trail, so you do not need to worry about the parking being full (at least for noe). We saw less than 10 people during the whole hike. From the parking, follow the marks of the trail. The marks are wooden sticks with yellow paint. The trail is very well marked in my opinion.
At the end of the hike, you will reach a big rock formation with blue water between the rocks. You can walk around the rock formation, and there are marks around to guide you. This is also the perfect place to take a break and have lunch, which is what we did.

This hike was my absolute favorite of the trip! You get to hike through different conditions, such as river crossings, snow, mud, and rocks. The hike is also very steep at certain points, and I always love a good challenge. The view at the end is also not what you expect. Although I saw pictures online, it was so much better in real life. In addition, we were lucky to be hiking on a sunny day with blue skies. I was hiking with shorts and a t-shirt, which is incredible considering the rainy Iceland weather in the summer.
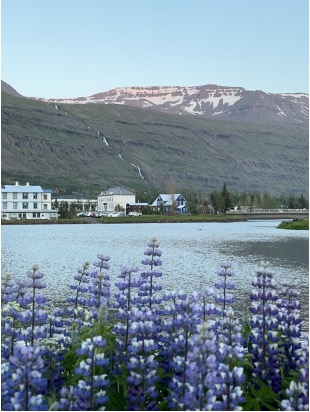
9:00 pm: Seydisfjordur
- Parking fee: Free
- Time spent: 30 minutes
- Rating: 6/10
- Drones allowed: Yes
- Physical activity: 1/4
We just walked around the town for around 30 minutes and spent the night there at the campsite in the town. An attraction that brought us there was a white church that had a rainbow street in front of it that was great for photography. Also, we walked around a small lake in the middle of the town.
10:00 pm: Campsite
We stayed at the campsite in Seydisfjordur called Seydisfjordur Campsite.
- Personal rating: 4.2/5
- Explanation: The showers were not included in the price of the campsite per night, which can be sometimes annoying because it adds unexpected costs. On top of the basic washroom, showers, and sinks, they also had indoor sinks, an indoor kitchen and an indoor dining area.
Day 6: Vestahorn, Jokulsarlon Glacier and Diamond Beach
3:00 pm: Vestahorn
- Parking fee: 10.00 CAD/person
- Time spent: 2 hours
- Rating: 8/10
- Drones allowed: Yes
- Physical activity: 2/4
Search “Stokksness” on Google Maps and it will lead you towards it.
Before entering, you will arrive at the Viking Cafe. You must go inside to pay for entry. The cost at the time was 10.00 CAD per person, and there were no additional charges for parking.
The workers at the Viking Cafe will also explain this to you, but there are different viewpoints in the area. There is a mini viking village, a place to see seals, a lighthouse, and of course the black sand beach.


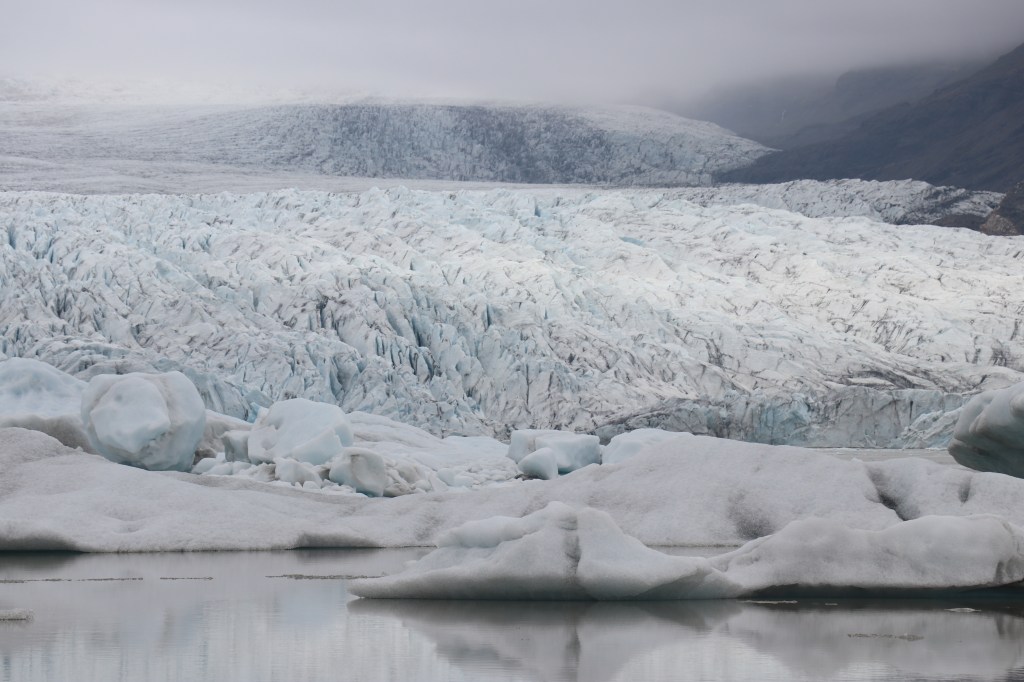
6:00 pm: Jökulsárlón
- Parking fee: Free
- Time spent: 40 minutes
- Rating: 7/10
- Drones allowed: No
- Physical activity: 1/4
Search “Jökulsárlón” on Google Maps and it will lead you towards it. We went on a foggy day, so we did not get to see the glacier. We did get to see the icebergs.
Although we did not do an Ice Cave tour, I had heard great things about it. You enter a super big Ice Cave and it looks absolutely gorgeous. If you would like to book an Ice Cave tour near Jökulsárlón, click here.

7:00 pm: Diamond Beach
- Parking fee: Free
- Time spent: 30 minutes
- Rating: 7/10
- Drones allowed: No
- Physical activity: 1/4
On Google Maps, it will show that Diamond Beach is accessible by “Diamond Beach Parking,” which is right before a small bridge. However, we found it to be better to be parked after the bridge. You would just need to continue on the ring road (road 1) until you cross the bridge, and you will see a parking lot on your left.
The diamonds are ice that come from the Jökulsárlón glacier and that get washed up onto the black sand beach’s shore. Being someone that does not like overhyped locations, I loved it so much. Even though we went in the evening and on a rainy day, there were a good amount of tourists, so during the peak summer months, it must be busy.

9:00 pm: Campsite
We arrived at our campsite called Svinafell Campsite.
- Personal rating: 4/5
- Explanation: They had a bit more than the basics, such as showers, bathrooms, a kitchen, kettles, and an indoor seating area.
Day 7: Fjallsárlón Glacier, Múlagljúfur Canyon and Svínafellsjökull Glacier
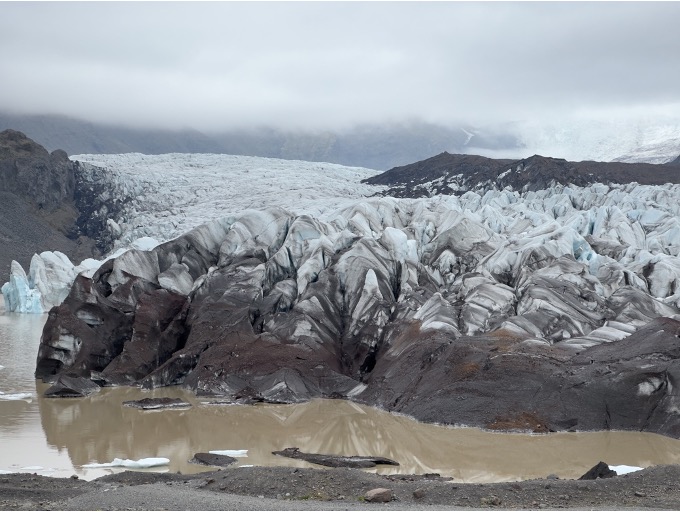
12:00 pm: Fjallsárlón Glacier
- Parking fee: Free
- Time spent: 1 hour
- Rating: 8/10
- Drones allowed: No
- Physical activity: 2/4
Search “Fjallsárlón Glacier Parking” on Google Maps, and it will lead you to the right location. The parking is very close to the glacier.
We got to see the glacier here! It was pretty, and the glacier was massive. We didn’t do much walking around the glacier. It was more of a sightseeing moment. We also got to see a seal on the shore.
2:00 pm: Múlagljúfur Canyon
- Parking fee: Free
- Time spent: 3 hours
- Rating: 10/10
- Drones allowed: Yes
- Physical activity: 4/4
The coordinates of the parking lot are N 63.993021°; W 16.436285°.The hiking trail is well marked.

The hike is stunning. The cliffs are covered in vibrant green moss, and there are waterfalls everywhere. I recommend hiking all the way up, past the famous view of the canyon. The hike afterwards is quite steep and challenging, but it is very much worth the view.
6:00 pm: Svínafellsjökull Glacier
- Parking fee: Free
- Time spent: 30 minutes
- Rating: 7/10
- Drones allowed: No
- Physical activity: 2/5
Parking on Google Maps is called “Svinafellsjokull Parking.” Compared to the other glacier, you can see it a lot closer! Reaching the glacier requires a short walk.
8:00 pm: Campsite
We arrived at Tjaldsvaedid Kleifar campsite.
- Personal rating: 3/5
- Explanation: The price was inexpensive (7.50 CAD per person). They had washrooms and sinks for dishes. There were no showers. The sinks also only had cold water.
Day 8: Fjaðrárgljúfur, Hjörleifshöfði and Reynisfjara
12:00 pm: Fjaðrárgljúfur
- Parking fee: Free
- Time spent: 1 hour
- Rating: 5/10
- Drones allowed: Yes
- Physical activity: 2/4
On Google Maps, search “Fjadrargljufur” and you will arrive at your destination. There are two parkings. Once of them is on road 206, which is the road that you will drive on after turning right on the ring road. The other parking is on F206, which would technically only be accessible for 4×4 vehicles.
From the parking lot, you still need to walk a bit to get to the end point. Along the walk, there are several lookout platforms where you can see the canyon from a better viewpoint.
There were A LOT of people here. The scenery was also similar in my opinion to Múlagljúfur Canyon because it was a canyon, it was filled with green moss, and there was water or waterfalls. Múlagljúfur was a lot less crowded. Also, the views were more impressive. It was also more rewarding to see the view at the Múlagljúfur Canyon due of the hike.

2:00 pm: Hjörleifshöfði
- Parking fee: Free
- Time spent: 15 minutes
- Rating: 4/10
- Drones allowed: Yes
- Physical activity: 1/4
We went to Hjorleifshofoi not for the hike, but for the Yoda Cave. To get there, type “Gígjagjá” on Google Maps. It will bring you right in front of the cave.
Many people go to Hjörleifshöfði for the hike. However, having already done a lot of hiking and having a big hike planned for the next day, we decided to skip the hike and directly go see the Yoda Cave. Nevertheless, the hike is apparently very pretty.

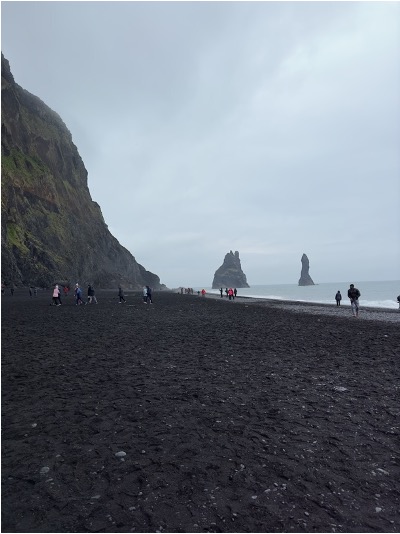
3:00 pm: Reynisfjara
- Parking fee: Free
- Time spent: 30 minutes
- Rating: 4/10
- Drones allowed: No
- Physical activity: 1/4
Reynisfjara is a black sand beach, also known for its dangerous waves and basalt columns.
The beach is gorgeous beach but overrated due to the big crowds at the beach. If you want the place to yourself, make sure to go early in the morning. Also, black sand beaches are everywhere in Iceland, so this one blended in with the other ones.
6:00 pm: Campsite
We stayed at Vik Campsite.
- Personal rating: 4.4/5
- Explanation: The negatives are that you need to pay extra for showers. Also, the showers are without curtains. The positives are that the campsite is in a great location, it has a nice seating area indoors, a kitchen, and kettles.
Day 9: Skool beans and Þakgil
10:00 am: Skool Beans
Skool Beans is a cafe in a school bus. I went there in the morning to get a coffee. They also serve breakfast. I highly recommend; it was such a unique spot. It’s also right next to Vik Campsite, which is where we were at the previous night.
12:00 pm: Þakgil
- Parking fee: Free
- Time spent: 6 hours
- Rating: 9/10
- Drones allowed: No
- Physical activity: 4/4
To get there, type “Þakgil” on Google Maps. Once you get off the ring road, the road will be very bumpy. However, the drive is gorgeous, so don’t forget to take in the view.
We parked at the Þakgil campsite since we were camping there overnight night. However, if you do decide to go without camping, you can still park for free.
We did the yellow trail loop hike. We started our hike at the campsite and did it clockwise. However, most people do the hike counterclockwise, starting with the purple trail. They then continue the yellow trail to complete the loop counterclockwise.
Unfortunately, we did not complete the loop. Once we were halfway, a lot of clouds blocked our vision, which lead to us not being able to find the right path to the trail. To not get lost further, we descended the same way we came up. Therefore, I recommend hiking on a sunny day without clouds. Even for us, the weather was only slightly cloudy. However, once you get to the top of the mountain, the clouds reach your level.
7:00 pm: Campsite
We stayed at the Þakgil Campsite for the night.
- Personal rating: 4/5
- Explanation: This was the prettiest campsite we went to. There were mountains all around us. We had washrooms, showers (included in the price) and outdoor dish sinks. However, there were no indoor seating area or kitchen.
Day 10: Dyrhólaey, Skógafoss, Seljalandsfoss and Reykjadalur Hot Spring Thermal River
12:00 pm: Dyrhólaey
- Parking fee: Free
- Time spent: 30 minutes
- Rating: 6/10
- Drones allowed: No
- Physical activity: 1/4
Dyrhólaey is a small hill on the coast of southern Iceland. You can also find a lighthouse and an arc. It is a popular spot along the south coast to see puffins. However, we did not see any here.
To get there, there are 2 parking lots. There is one at the top of the hill and one at the bottom of a hill. We parked at the one on top of the hill, which is also where the lighthouse is. To get there, search “Dyrhólaey Lighthouse” on Google Maps.
From the parking lot, we walked along the coast and took in the view. You can also see the view of a black sand beach from a higher viewpoint which is nice.

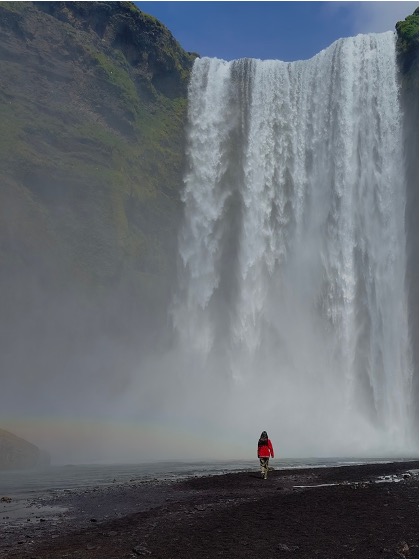
1:00 pm: Skógafoss
- Parking fee: Free
- Time spent: 1 hour
- Rating: 9/10
- Drones allowed: No
- Physical activity: 2/4
To get to Skógafoss, search “Skogafoss” on Google Maps. The parking is at the base of the waterfall.
Usually, I do not get impressed by over popular attractions, but Skógafoss was worth the hype.
You can get close to the base of the waterfall but be careful because you will get wet. Make sure to bring waterproof clothing if you want to get close to the fall. There are also stairs on the right side of the waterfall that you can take to walk to the top of the waterfall.
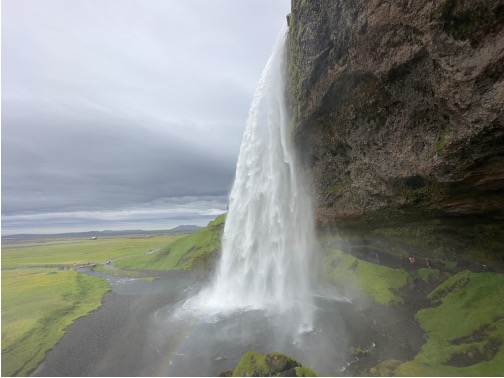
3:00 pm: Seljalandsfoss
- Parking fee: Yes
- Time spent: 1 hour
- Rating: 8/10
- Drones allowed: No
- Physical activity: 2/4
To get to Seljalandsfoss, search “Seljalandsfoss” on Google Maps. The parking starts at Seljalandsfoss, but make sure to walk all the way to the left to see all the waterfalls! The last one is very impressive and skipped by many people. It is a waterfall inside a cave.
Seljalandsfoss is famous for the fact that you can walk behind it. Make sure to wear waterproof clothes or clothes that you don’t mind getting wet.
To book a tour to these two amazing waterfalls and Reynisfjara, which we did on day 8, click here.
6:00 pm: Campsite
We stayed at Reykjamörk Hveragerði Campsite for the night.
- Personal rating: 3.5/5
- Explanation: They only had a single shower and a single toilet for each gender. However, we did not have to wait to use them, most probably because we showered very late. They also have a small shed with a kitchen and a seating area.
8:00 pm: Reykjadalur Hot Spring Thermal River Trailhead
- Parking fee: Yes
- Time spent: 3 hours
- Rating: 7/10
- Drones allowed: Yes
- Physical activity: 4/4
Reykjadalur is a hike that leads you to a natural hot spring. To get there, search “Reykjadalur Hot Spring Thermal River” on Google Maps and it will lead you to the parking lot. The parking is a paid by the hour parking, with a base rate. We stayed for 3 hours, and it was around 9.00 CAD.
The trail is straight forward and easy to follow. You walk on somewhat paved/gravel road most of the time. The hike is easy to moderate. Near the end, you will see a man-made wooden platform that people use to get into the hot spring. When we went, we walked until the end of the trail. We stayed in the water for 1 hour.
Caution: Be careful when you walk on the wood and on the stairs down that lead to the hot spring. I slipped there and had a huge bruise for a week. I thought I was the only clumsy person that fell, many other people also slipped after me.

Day 11: Golden Circle
1:00 pm: Kerid Crater
- Parking fee: Yes
- Time spent: 30 minutes
- Rating: 4/10
- Drones allowed: No
- Physical activity: 1/4
To get to Kerid, search “Kerid Crater” on Google Maps. The parking is right next to the crater.
There is a path around the crater where you can walk on. At one point, you can also walk down to the water that is in the crater. Although the crater was gorgeous, there are so many other craters that in my opinion are even more gorgeous and that have way less tourists.

3:00 pm: Thingvellir National Park
- Parking fee: Yes
- Time spent: 30 minutes
- Rating: 2/10
- Drones allowed: No
- Physical activity: 2/4
Parking at Thingvellir National Park depends on the attractions that you want to see. To go where we were at, search “Öxarárfoss Parking” on Google Maps.
There are many different things to see, but we went to see Öxarárfoss and walked towards Lögberg and back.
After seeing so many gorgeous sights in Iceland, we were just really underwhelmed with Thingvellir. It would have maybe been a better idea to start off with the Golden Circle instead of finishing with it.

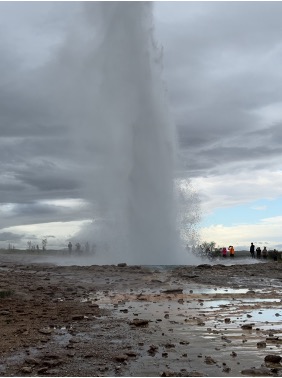
5:00 pm: Strokkur & Geysir
- Parking fee: Free
- Time spent: 30 minutes
- Rating: 6/10
- Drones allowed: No
- Physical activity: 2/4
To get there, search “Strokkur” on Google Maps. From road 35, the road that you are on, you will turn left onto road 355, the side where Strokkur and Geysir are on. If you continue down the road, you will see the parking lot.
Stokkur is the one that shoots up every 5-10 minutes and that everyone is waiting for. The height of the water can go very high, but it is different each time. Therefore, I suggest for you to stay for multiple times to make sure you can catch big ones.
Geysir is inactive. It only erupts rarely, so people are not standing around it waiting for it to erupt.
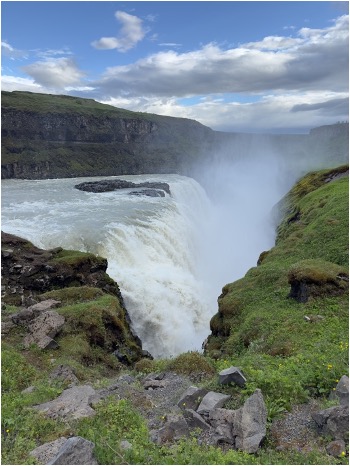
6:00 pm: Gullfoss
- Parking fee: Free
- Time spent: 45 minutes
- Rating: 7/10
- Drones allowed: No
- Physical activity: 2/4
To get there, search “Gullfoss Car Park” on Google Maps. From the parking, it is a very short downhill walk to the waterfall.
At the waterfall, there is also an indoor area where you can buy food and gifts.
Although a very popular destination, the waterfall was beautiful and very powerful, which made it very impressive. I would definitely recommend this attraction in the Golden Circle.
If you would like to do the Golden Circle with a tour, click here for a tour that I highly recommend!
8:00 pm: Campsite
We stayed at Skjol Kjoastadir Campsite for the night.
- Personal rating: 3/5
- Explanation: They had washrooms, outdoor sinks to wash dishes (only cold water), showers that were not included in the price. They did not have a kitchen or an indoor seating area. They do have a restaurant that you can pay out of pocket for.
Day 12: Horseshoe Bend and Kerlingarfjöll
12:00 pm: Horseshoe Bend
The Horseshoe Bend is not visible on ground level, but rather photographed with a drone. However, be careful because the winds are very strong.
To get there, put these coordinates on your Google maps: 64.671267,-19.287541. There is a very small parking that can fit 1-2 cars.
1:00 pm: Kerlingarfjöll
- Parking fee: Free
- Time spent: 3 hours
- Rating: 10/10
- Drones allowed: Yes
- Physical activity: 4/4
Google Maps does not seem to work for directions to Kerlingarfjöll. Starting from Gullfoss, make your way onto road 35 and head north. On Google Maps, it will show that it is F35, but it is not considered an F road anymore. After driving on road 35 for around an hour, turn right on F347. If you zoom in on Google Maps, you will be able to see the number of these roads more clearly. Drive on F347 until you make it to “Hveradalir Thermal Area Parking.”
We explored the area by walking on a marked path, around the mountains. The area can smell quite bad due to the sulfur, so prepare yourself.
If you are interested in visiting Kerlingarfjöll with a tour, I highly recommend this tour! They will pick you up in Akureyri and drive you to Hveravellir and Kerlingarfjöll. The route that they take is a route that is not easy to drive on for everyone, so booking with them can help you save a lot of hassle.


6:00 pm: Campsite
We stayed at Skjol Kjoastadir Campsite for the night.
- Personal rating: 3/5
- Explanation: They had washrooms, outdoor sinks to wash dishes (only cold water), showers that were not included in the price. They did not have a kitchen or an indoor seating area. They do have a restaurant that you can pay out of pocket for.
- Instead, we would have stayed at a campsite that was closer to our destination the following day, Landmannalaugar.
Day 13: Sigöldugljúfur, Bláhylur and Landmannalaugar
11:00 am: Sigöldugljúfur
- Parking fee: Free
- Time spent: 15 minutes
- Rating: 8/10
- Drones allowed: Yes
- Physical activity: 1/4
Sigöldugljúfur, also known as the Valley of Tears, is a canyon with waterfalls. To get there, type 64°09’20.8″N 19°08’18.3″W, which will bring you to the parking lot. Or, from Gullfoss, take road 35 in the south direction. Then, turn left onto road 30. After, turn left onto road 32. Finally, continue straight on F26. Then, turn right on F206. Once you are almost there, you will need to turn left onto a small road, which will lead you to the parking lot/scenic spot.

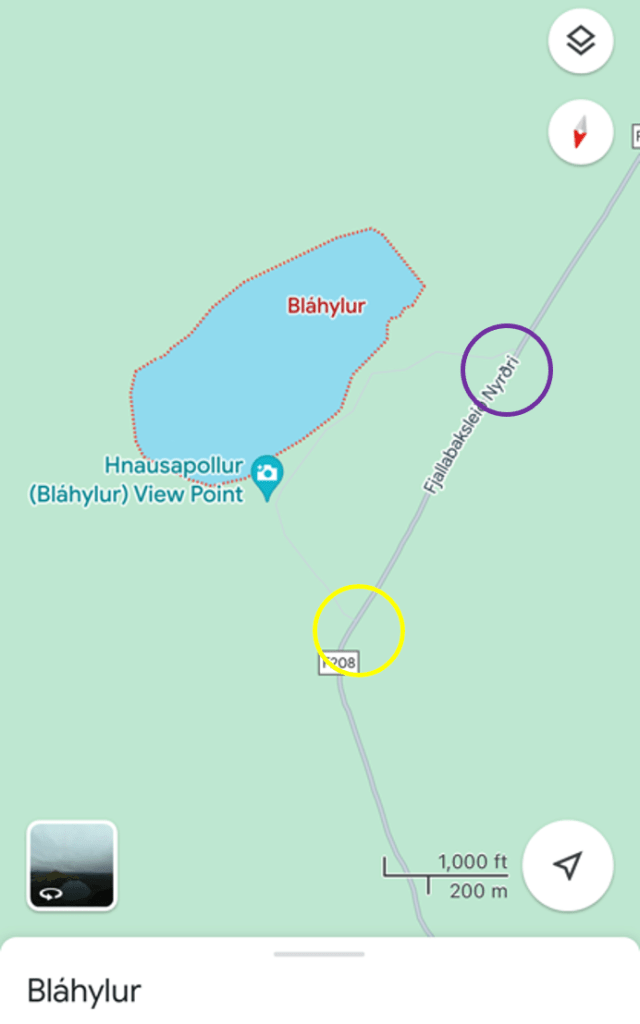
12:00 pm: Bláhylur
- Parking fee: Free
- Time spent: 15 minutes
- Rating: 9/10
- Drones allowed: Yes
- Physical activity: 1/4
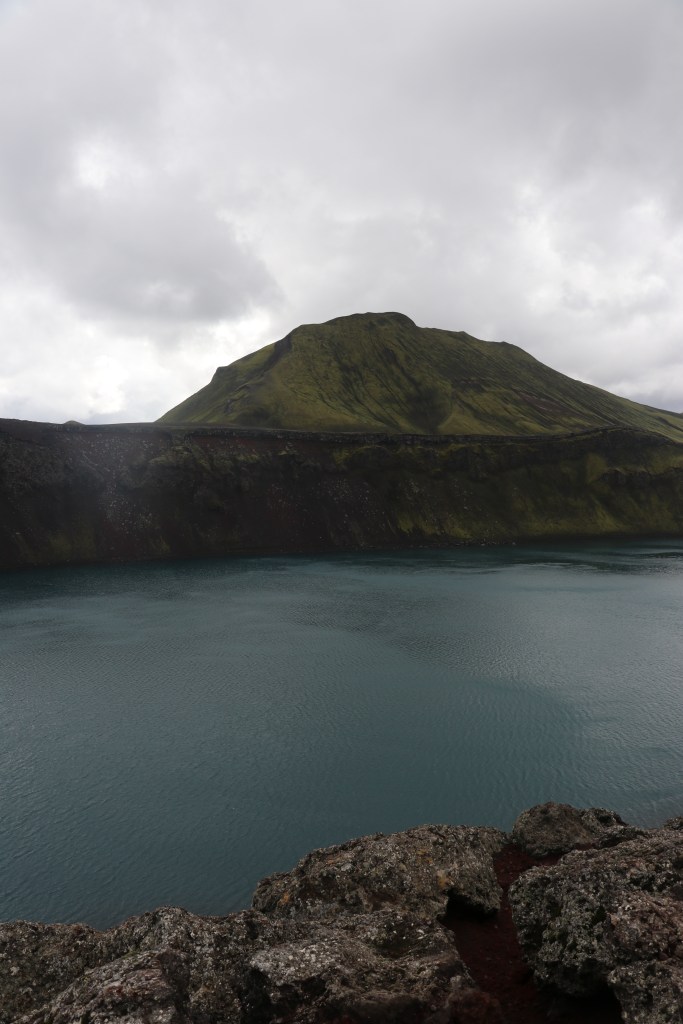
Blahylur is a gorgeous blue crater in the highlands. To get there, type “Bláhylur” on Google Maps. However, the route is not accurate at the last moment. Google will tell you to turn left to the crater at the purple circle. However, you need to turn left at the yellow circle, which is before the purple circle. In fact, that route is a one way, so you should not go in by the purple circle.
The crater is so pretty. If you have a drone AND if it is not windy, this spot would be perfect for aerial photography.
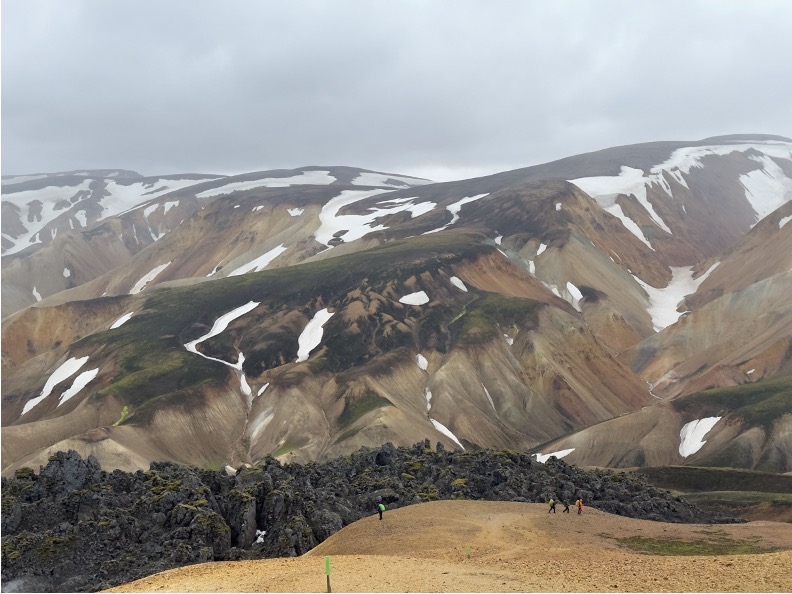
1:00 pm: Landmannalaugar
- Parking fee: Free
- Time spent: 5 hours
- Rating: 10/10
- Drones allowed: No
- Physical activity: 4/4
To get to Landmannalaugar, you need a 4×4. If you take the route of F208 north, there are no river crossings. It is just bumpy, but if you drive slowly, you’ll be fine. There is one big river crossing at the end, but NOBODY crosses it. There is a parking right before that river. After parking, there is a small bridge for you to walk over the river.
Note: F208 north and F208 south are completely different paths. I initially thought that they were the same path, but that you were simply driving in opposite directions. However, F208 north is actually a road that is north of Landmannalaugar, whereas F208 south is a road that is south of Landmannalaugar.
There are multiple hikes that you can do. We decided to combine two hikes, and we did the Blahnúkúr followed by Brennisteinsalda. It is a loop hike where you can experience the best views.
- Distance: 9.7 km
- Time: 4 to 6 hours
- Difficulty: Hard
The Blahnúkúr hike is a lot easier than Brennisteinsalda. During the Brennisteinsalda hike, you will need to do two river crossings, once before hiking up the mountain, and once after reaching the bottom of the mountain. The river crossings are not long.
For this day’s itinerary but with a tour, you can book here! Among the many things included, they offer pick up from Reykjavik for those who do not feel comfortable on F-roads.
8:00 pm: Campsite
We stayed at Grindavik Campsite for the night.
- Personal rating: 4.2/5
- Explanation: Showers were included, and they were nicer than typical campsites. There was an indoor seating area and a kitchen. There was also free WIFI.
Day 14: Blue Lagoon, Puffin Tour and Reykjavik
7:00 am: Blue Lagoon
- Parking fee: Free
- Time spent: 3 hours
- Rating: 8/10
- Drones allowed: No
- Physical activity: 1/4
We went at 7:00 am, which is the first time slot available, and it did not feel crowded. I recommend going the earliest in the morning. Once it hits 8:00 am and 9:00 am, there was an accumulation of people from 7, 8 and 9 am, so it was a lot more crowded.
We got the comfort ticket. It included a face mask and a drink at the lagoon bar.
The Blue Lagoon is indeed overrated. It is very expensive, and it can get very crowded if you do not go in the morning. However, I do not regret going there. Because the Blue Lagoon is such an iconic place, I felt like I couldn’t come to Iceland without experiencing what it was like. Nevertheless, I would not return here if I were to come to Iceland again. I do recommend it if you are very interested.

Many people recommend Sky Lagoon as a cheaper alternative. We did not go, so I cannot make any comments about it.
12:00 pm: Puffin Tour
- Parking fee: Free
- Time spent: 1 hour
- Rating: 8/10
- Drones allowed: No
- Physical activity: 1/5
We booked a one-hour Puffin tour with Special Tours, called Puffins Express. It was a boat tour that took us to different small islands around Reykjavik.
We booked this tour because we were not able to see puffins at Dyrholaey, which is where we originally planned to see them. We would not have gone on the tour if we had seen them throughout our road trip. Nevertheless, we loved this tour. The guide was super helpful at directing us on where to look for the puffins. They would move the boat as close as possible for us to see them the clearest possible.

2:00 pm: Reykjavik
- Parking fee: Free
- Time spent: 5 hours
- Rating: 6/10
- Drones allowed: Depends
- Physical activity: 2/4
If you visit the city with a car, there is a free parking that you can park at. It’s called “Free parking” on Google Maps: Free parking
We visited a few of the city’s attractions such as:
- Harpa
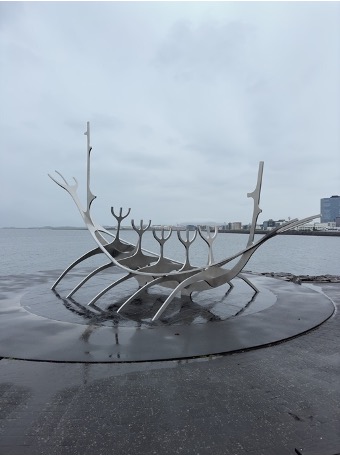
- Sun Voyager
- Hallgrimskirkja Church
- Rainbow street
- Perlan

Everything was within walking distance since the city is quite small.
We also went to a few places to eat:
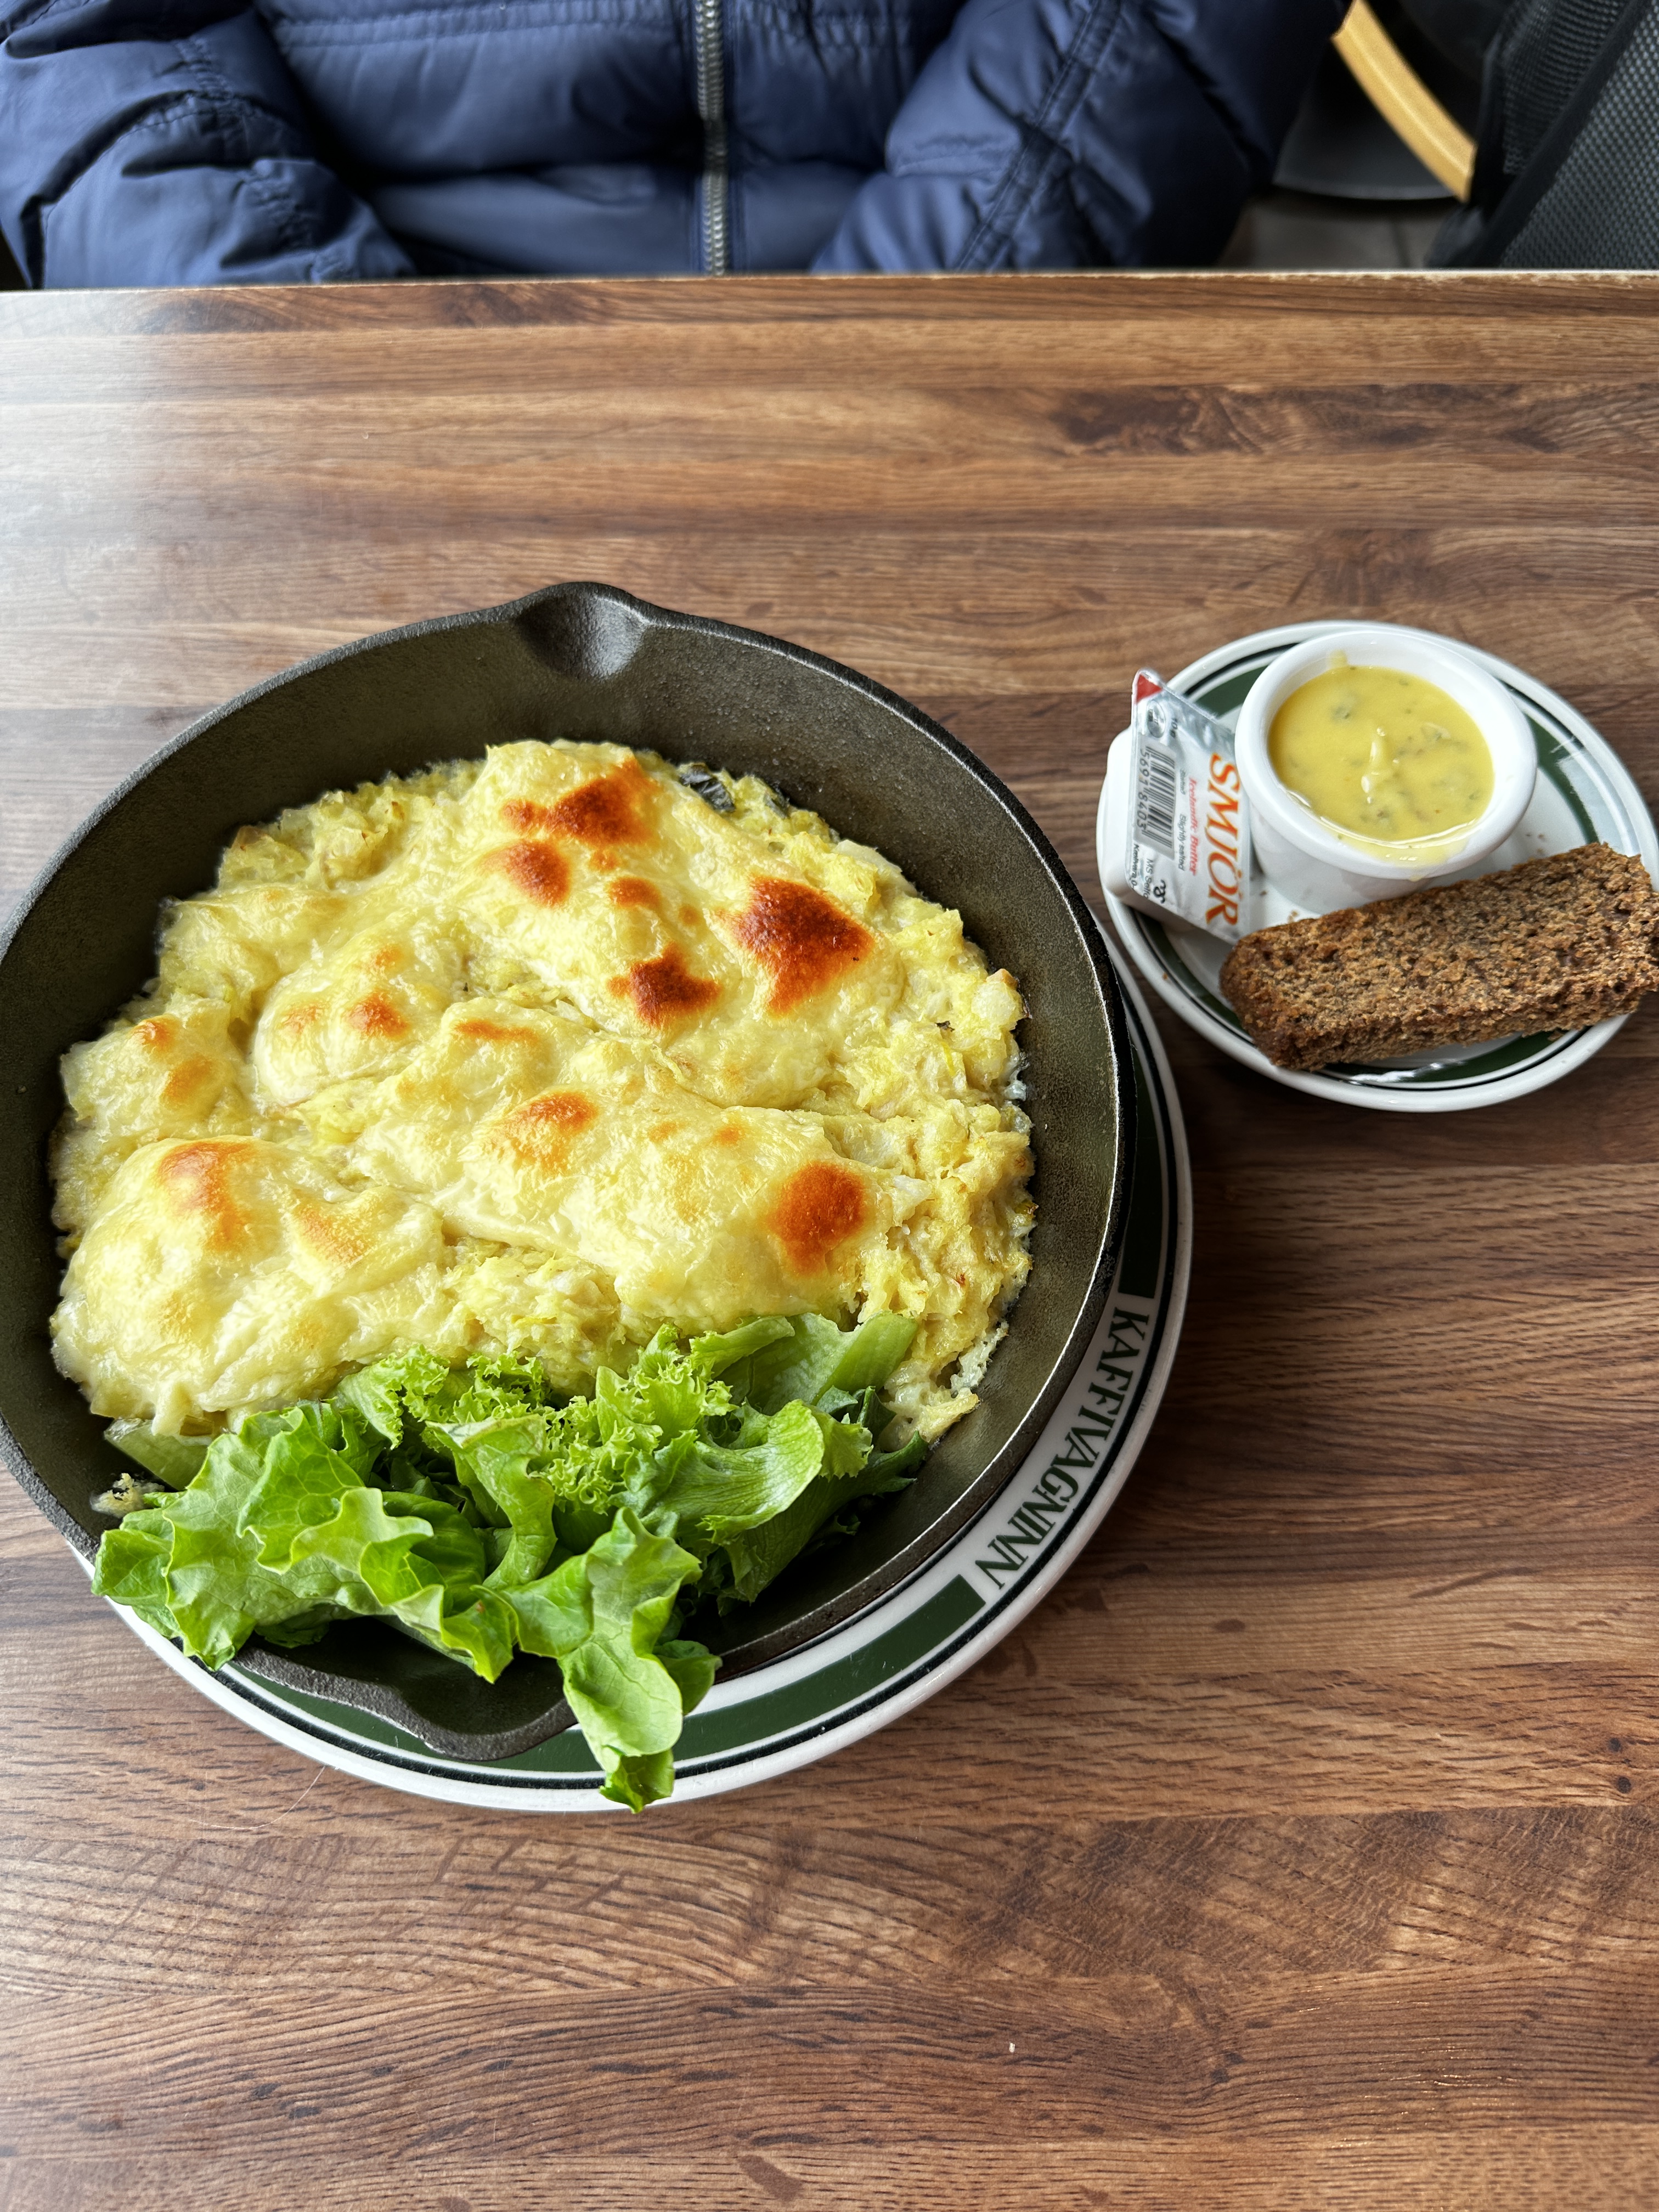
- Kaffivagninn. We had their fish stew, which was very good, considering that I am not a fan of fish.
- Baejarins Beztu Pylsur. They are very known for their hot dogs. They were honestly the best hot dogs that I have ever had. However, they are pretty expensive, but they are also one of the cheapest food that you will find in the city.
- Ramen Momo. On a rainy day, we loved having something warm. Also, they are the only ramen restaurant in Iceland.
- Messinn. They serve a lot of fish. Although I am not a fan of fish, I absolutely adored their cod.
- Svarta Kaffið. They only sell two meals. It is a soup in a bowl made of bread. The soup is either made with lamb or vegetarian. I highly recommend.


If I were to rank these five places on the importance of trying them, I would rank them as following: 2 > 4 > 5 > 1 > 3.
10:00 pm: Campsite
We stayed at Vogar Campsite for the night.
- Personal rating: 3.5/5
- Explanation: They had bathrooms, showers, and an indoor area. However, we did not use their facilities much.
Our flight departed the next morning. Therefore, this is the end of our 14-day itinerary to Iceland.
Useful Links
Below are useful links for you to save for your Iceland trip.
- This link brings you to a Google Maps page with all the destinations in the itinerary pinned, including our camping locations.
- This link brings you to a Google Maps page with all the campsites in Iceland. The map is very accurate, but there sometimes are mistakes. Make sure to call in advance before going to the campsite. One time, we were driving towards one of the campsites mentioned on the map. However, we realized that the campsite did not actually exist.
- This link brings you to a Google Maps page with all the gas stations in Iceland. We did not use this link because gas stations were commonly found along the way.
- This link brings you to a Google Maps page with all the hot springs in Iceland. We did not use this link because we had already searched for hot springs to go to beforehand and did not have time to squeeze in more hot springs.
- This website shows the most accurate weather in certain regions in Iceland.
- This website shows the road conditions, as well as if the F-roads are open or not.
- This website updates you on general safety information in Iceland.
Our Packing List
All linked items are exactly the items that we also brought, if not, almost identical, because for some items I could not find the exact same thing.
Electronics
- Car adapter
- Phone charger
- Portable chargers
- Drone and charger
- Camera and charger
- Film camera
- Headphones
- European charging adaptor
Feetwear
- Water shoes (1)
- Sneaker (1)
- Hiking boot (1)
Clothes
- Tshirts (2)
- Hoodies (2)
- Long sleeve shirts (3)
- Sports bras (2)
- Leggings (2)
- Pants (2)
- Shorts (1)
- Rainjacket (1)
- Rainpants (1)
- Pyjamas (1)
- Underwears
- Socks
- Bathing suits (2)
Camping gear
- Pot (1)
- Pan (1)
- Cooking stove (1)
- Cutting board (1)
- Utensils
- Cooking tools
- Sleeping bag
- Ziplocs
- Tupperwares
- Collapsible cooler
- Dish towel
- Dish sponge
- Bowls
Hygiene
Others
- Wallet
- Passport
- Waterbottle
- Sunglasses
- Sleeping mask
- Ear plugs
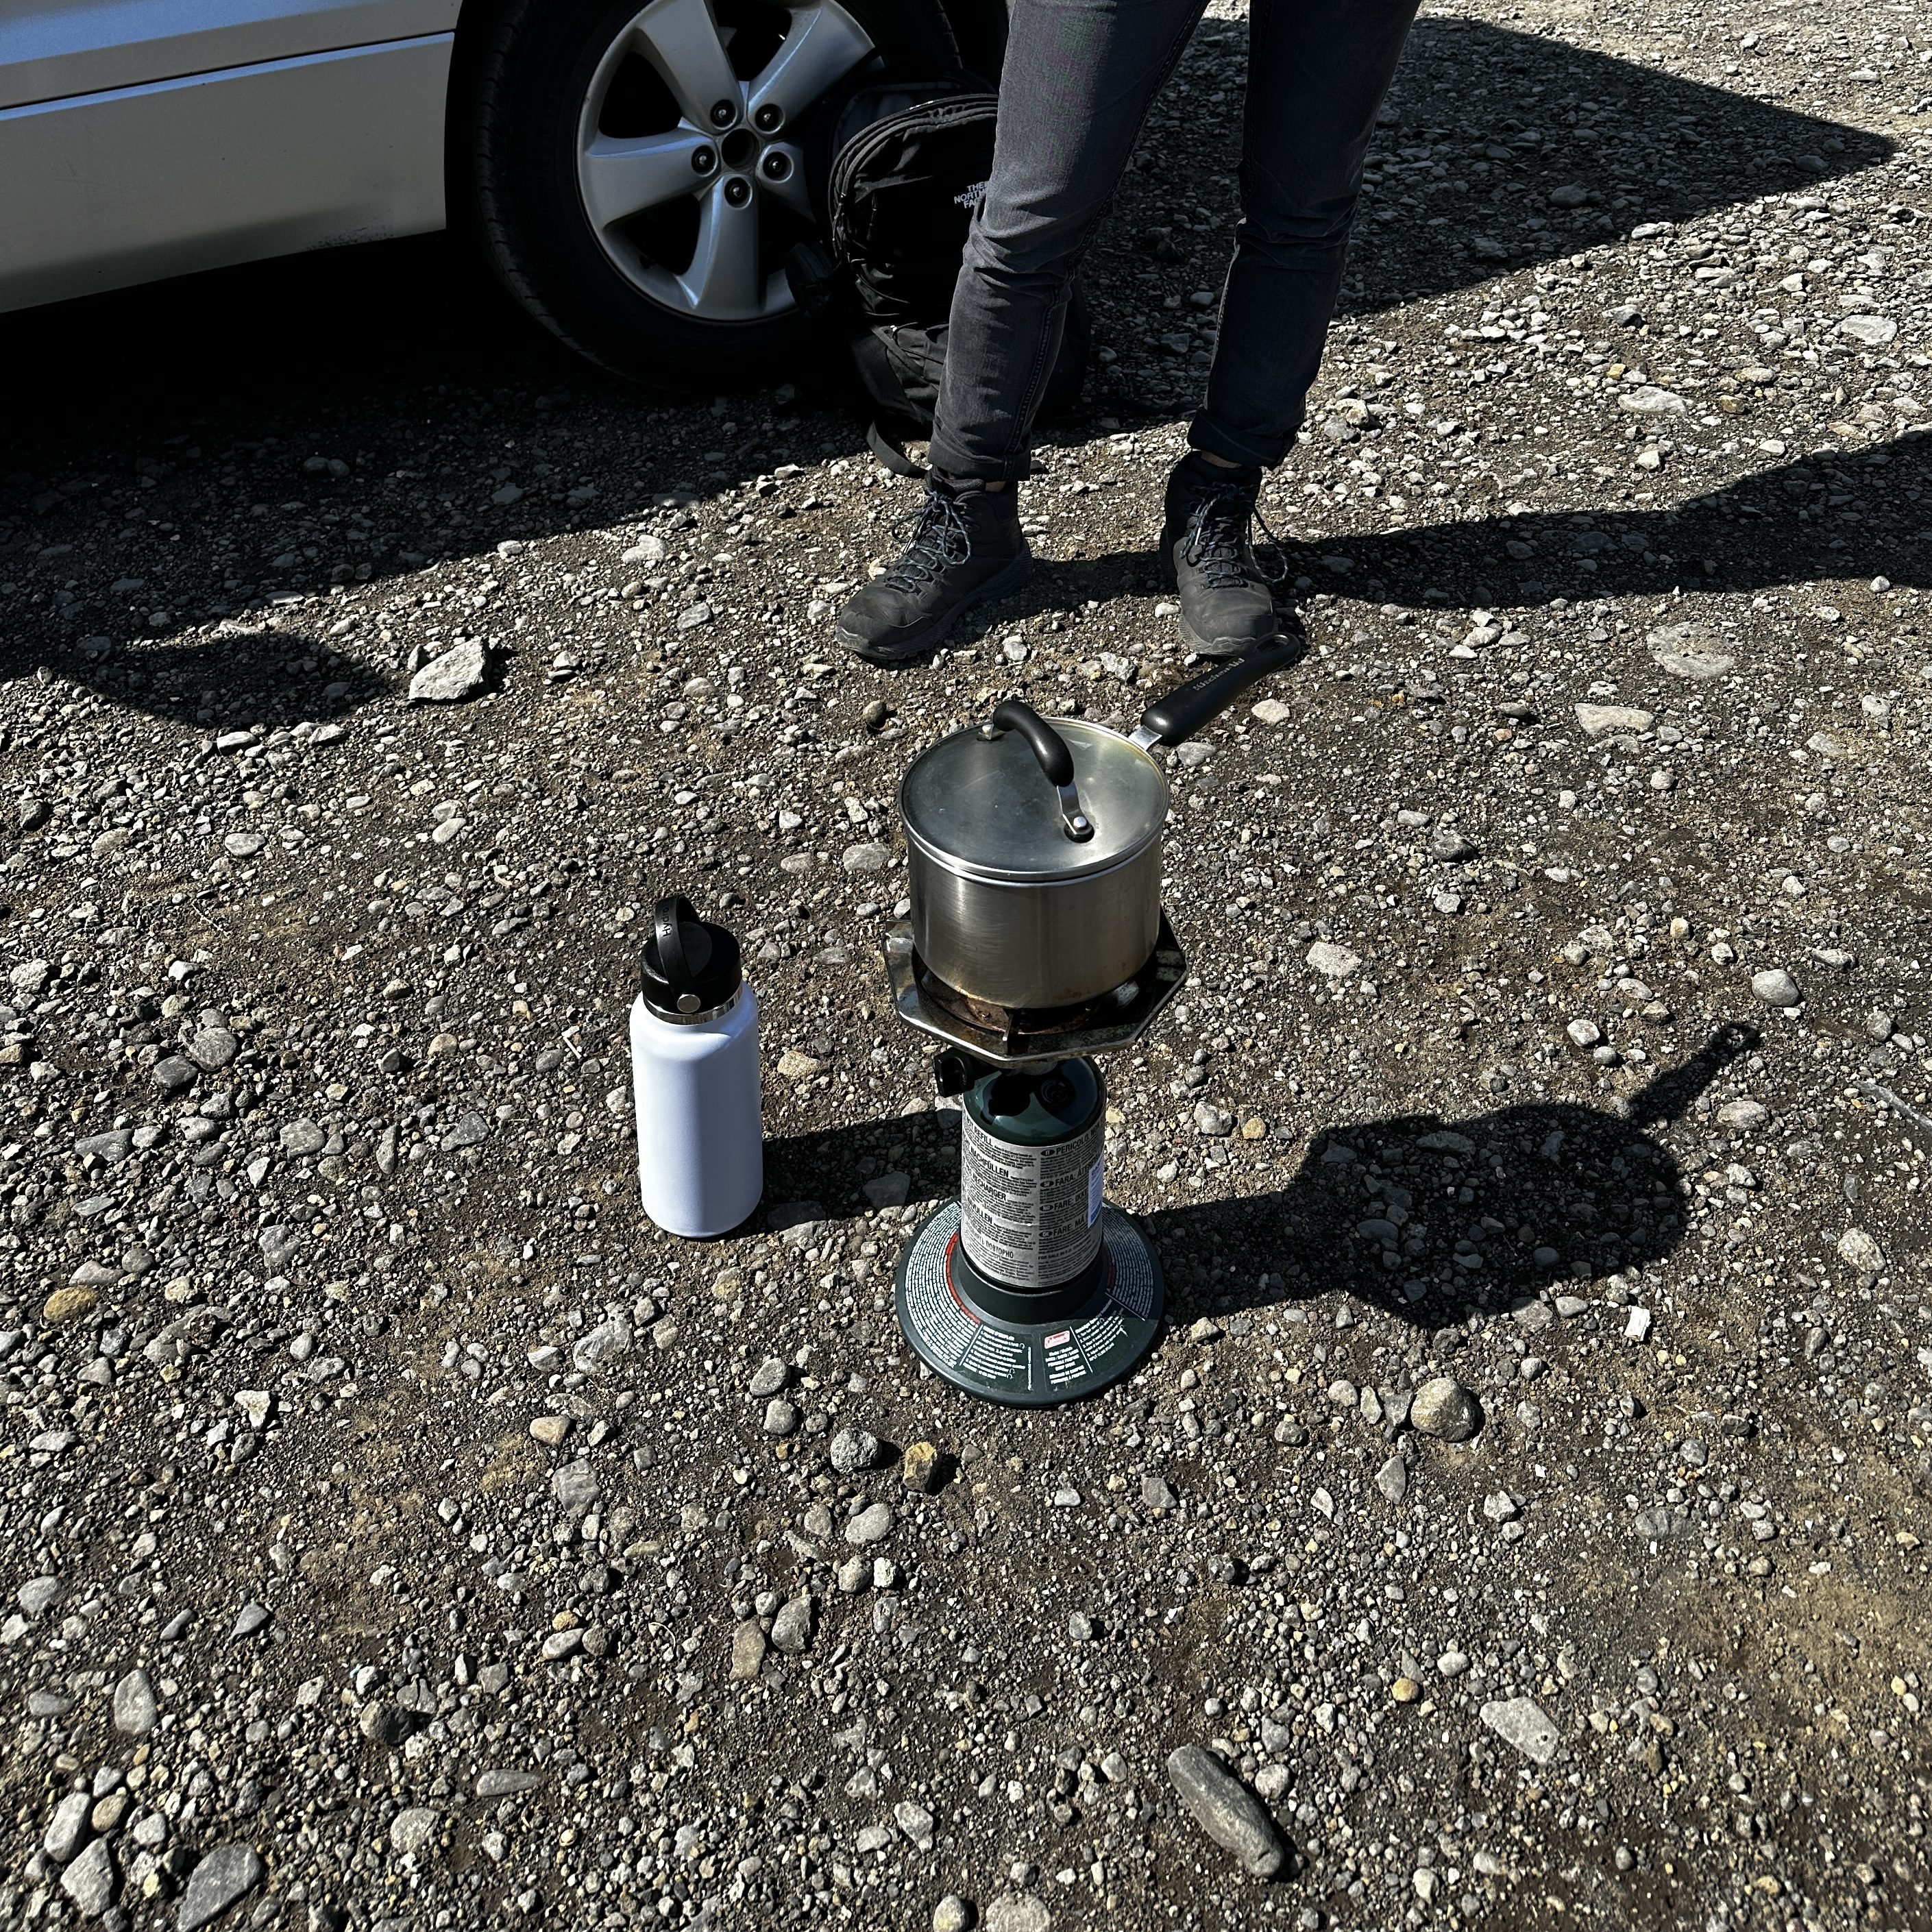
How We Cooked
Our stove set up consisted of a gas tank that we bought in Iceland, at gas stations. On top of the gas tank, we installed a stove that we brought from home. On top of the stove, we used mainly our pot to cook pasta, ramen, chilli, etc. Once you turn on the gas, you will need to a lighter, which we bought in Iceland, to keep the fire on.
Costs
Here is a breakdown of our spendings on our trip to Iceland. Everything is in CAD (Canadian Dollars). The total cost is for two people.
- Flights: 2500$
- Car rental and insurance: 3300$
- Gas: 1200$
- Groceries: 500$
- Eating out: 200$
- Campsites: 500$
- Parking fees: 90$
- eSIM: 20$
- Blue Lagoon tickets: 200$
- Puffins Express tickets (click here to book our tour!): 140$
- Cash: 209$
- Others: 400$
